DocuShare® Enterprise Workflow
Example 9
Using DSBranchTask
Copyright © 2003-2006 Xerox Corporation. All Rights Reserved.
Enterprise Workflow
docushare.dse@xerox.com
1 of 9
Introduction
This example demonstrates how to use the
DSBranchCallback interface. This interface
allows the developer to provide his/her own evaluation for the branch condition of the
DSBranchTask. This exercise demonstrates a sample DSBranchCallback
implementation that scans its predecessor tasks for their “For Approval” replies and sends
an approval notification message if at least two approved and sends a rejection
notification message otherwise.
Installation
1) Package the callback classes in a JAR file (for example,
custom.jar) and include
the JAR file in the WorkflowServer’s classpath in
<DS_HOME>\config\Monitor.xml.
Note
:
This example already comes with prepackaged callback classes
(
custom.jar). You need not do anything unless you modify the callback
classes.
<Server>
<Name>WorkflowServer</Name>
<JavaServer>
<JavaServerParam>
<StartJVMClassPath>
…;
+DSH+\drala\dwe\lib\custom.jar
</StartJVMClassPath>
</JavaServerParam>
</JavaServer>
</Server>
2) Add the
custom.jar to the classpath in start_studio.bat/sh and
start_manager.bat/sh scripts located in the <DS_HOME>\drala\dwe\bin
directory.
3) Ensure that DocuShare server is licensed with Full Workflow Service license
features. This can be verified by checking in the
Site Management->License
page in
the DocuShare administration console.
Deploying the Workflow
There are two ways to deploy the workflow.
1) Using the Workflow Studio to manually go through the exercise of building this
workflow and deploying it.
Copyright © 2003-2006 Xerox Corporation. All Rights Reserved.
Enterprise Workflow
docushare.dse@xerox.com
2 of 9
2) Opening the saved workflow file using workflow studio (easiest).
See Appendix
A
.
Using the Workflow Studio to Create and Deploy the Workflow
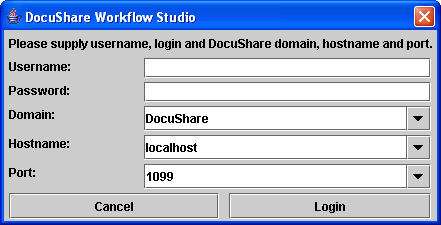
1) Start up the Enterprise Workflow Studio application by running
<DS_HOME>\drala\dwe\ bin\start_studio.bat in Windows or start_studio.sh
in Linux or Solaris. Then login as a DocuShare administrator or content
administrator.
Since we are assigning and removing rights to a certain users, we need a user who has
these access privileges to deploy the workflow.
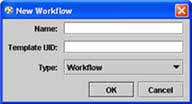
2) Upon successfully logging in, you should see the workflow studio application. Using
the menu, create a
Document Routing Workflow (
File->New Workflow-
>Document Routing Workflow
)
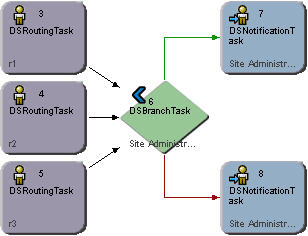
with three
DSRoutingTask, a DSBranchTask and two DSNotificationTask
instances. To do this, click on the button, on the right hand side of the Workflow
Studio window that corresponds to the item you want added and then click on an
empty spot in the workspace.
Connect the objects as shown in the figure below by dragging your mouse from one
object to another.
Copyright © 2003-2006 Xerox Corporation. All Rights Reserved.
Enterprise Workflow
docushare.dse@xerox.com
3 of 9
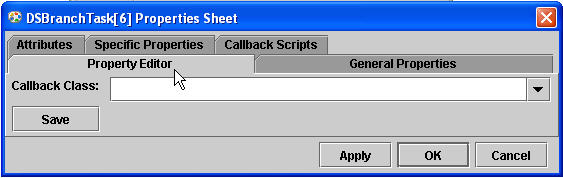
3) Double click on the
DSBranchTask and enter the callback class that you want
executed for this event. In this exercise, we will use a prewritten callback class called
my.workflow.ex9.BranchCallback.
Click Save
then
Ok
.
For more information on what this callback class does,
see
<DS_HOME>\drala\
dwe\custom\src\my\workflow\ex9\BranchCallback.java
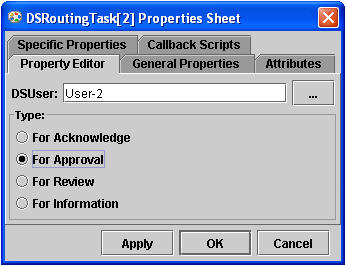
4) Double click on one of the
DSRoutingTask instance to open the property sheet, go
to the
Property Editor
tab, and fill in the values for the
DSUser
and
Type
field. Set
the
Type
field to “For Approval”. Set the
DSUser
field to the person you’re assigning
the task to. The
Document Handle
field should contain the handle to the document
you’d want to route.
Copyright © 2003-2006 Xerox Corporation. All Rights Reserved.
Enterprise Workflow
docushare.dse@xerox.com
4 of 9
Go to the two remaining
DSRoutingTask instance and set their
DSUser
field to
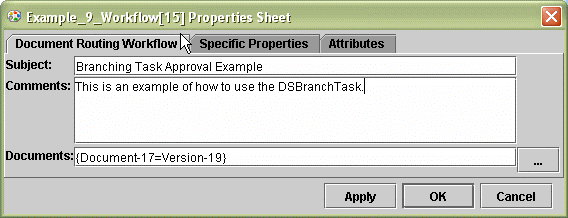
5) rom the menu bar, go to
Edit->Workflow Properties…
and type in text in the
OK
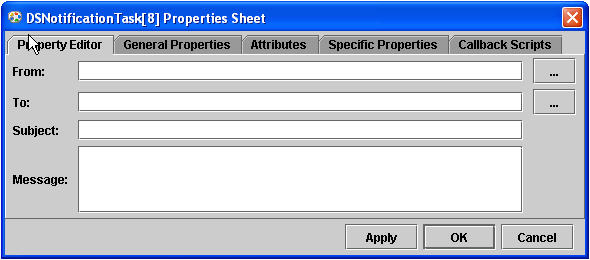
6) ouble click on
DSNotificationTask instance that’s connected to the
a true
o the same thing to the other
DSNotificationTask instance connected to the
)
u are finally ready to deploy the workflow! Select
Tools->Deploy Workflow
other users that have not been used. Also, set their
Type
field to “For Approval”.
F
Subject field. Then select a document version to be routed. Click on Apply then
when you’re done.
D
DSBranchTask by a green link (or true link). Fill in the desired values. This
notification message will be sent when the DSBranchTask callback returns
value – in this case, when at least two people approved.
D
false branch. This will be the rejection message.
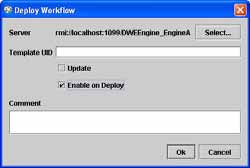
7 Now yo
from the menu bar. You should see the Deploy Workflow dialog.
Copyright © 2003-2006 Xerox Corporation. All Rights Reserved.
Enterprise Workflow
docushare.dse@xerox.com
5 of 9
Click on the
Select
button to select the workflow engine you want to connect to. In
9 ) then C
lick
nter a Template UID to identify this template. The following are deployment
k this checkbox if you want to update or deploy a new
g
●
rmines whether the deployed
) Start up the Workflow Manager application by running
<DS_HOME>\drala\dwe\bin\
) Select
File->Connect…
from the menu bar then select the RMI tab, from the resulting
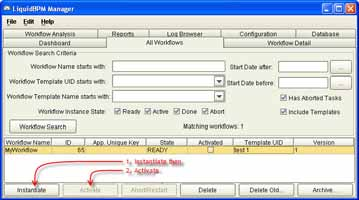
0) Select the “All Workflows” tab, check the Include Templates checkbox and then click
1) Select the deployed workflow template; click on the
Instantiate
button then the
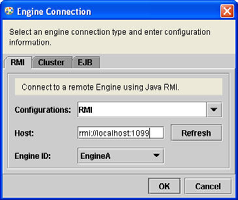
the Host field, type in the connection string in the following format:
rmi://<hostname>:<rmi_port> (
example:
rmi://localhost:109
OK
.
E
options for the template:
●
Update
:
Chec
version of an existing template. If this is the first time you’re deployin
the template leave this box unchecked.
Enable on Deploy
:
This checkbox dete
template is instantiable or not. Check this box if you want to be able to
create a workflow out of the template and run it.
8
start_manager.bat in Windows or start_manager.sh in Linux or Solaris.
Then login as a DocuShare administrator or content administrator.
9
Engine Connection dialog, and edit the “Host” field to reflect your environment.
Click on the
OK
button when you are done.
1
on the Workflow Search button. You should see the workflow template you’ve just
deployed.
1
Activate
button. You should see a running workflow at this point.
Copyright © 2003-2006 Xerox Corporation. All Rights Reserved.
Enterprise Workflow
docushare.dse@xerox.com
6 of 9
Summary
So what have we done? We have deployed a workflow with tasks assigned to three
people. When the task arrives in the DSBranchCallback, the callback implementation
will scan its predecessor tasks and count how many approved. If more than two people
approved the callback returns true, otherwise false. In addition, an approval or rejection
notification will also be sent.
For more information about the callback,
see
<DS_HOME>\drala\dwe\custom\src
\my\workflow\ex9\BranchCallback.java
Testing
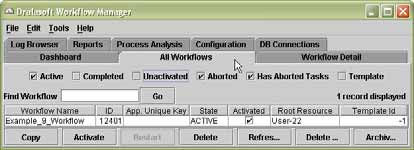
1) Deploy the workflow then go to the Workflow Manager and click on the
All
Workflows
tab. You should see a list of workflows including the one that you just
deployed.
Copyright © 2003-2006 Xerox Corporation. All Rights Reserved.
Enterprise Workflow
docushare.dse@xerox.com
7 of 9
2) Double click on the workflow that you just deployed. You will see that the entire
approval tasks are active – indicated by the green status indicator. The other tasks are
in ready status – indicated by the blue status indicator. As each active task is
completed, the status indicator changes from green to dark gray to indicate that the
task is done.
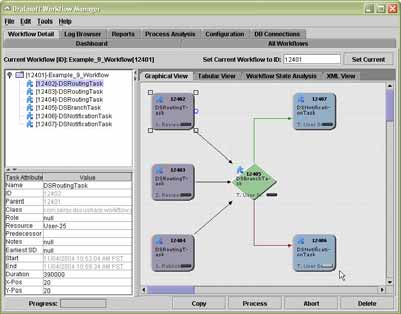
3) Login as the resource assigned to each task and approve or disapprove the assigned
task. Observe the status indicator of each task in Workflow Manager as you go on. In
the figure below, the notification task below the
DSBranchTask (false node) is
grayed (light gray) out, indicating that the task is “passive” – meaning, the task is not
considered required for the workflow to complete. The other notification task,
however, is in the “done” state.
In this example test run, you will see that
DSBranchTask callback returned true just
by looking at the status indicator in each task. Obviously, because it returned true the
branch connected to the false node becomes irrelevant, that’s why it’s in a passive
state.
Copyright © 2003-2006 Xerox Corporation. All Rights Reserved.
Enterprise Workflow
docushare.dse@xerox.com
8 of 9
Appendix A
Importing and Deploying an XML file Using Workflow Studio
1. Launch the Workflow Studio application
2. Go to
File->Open Workflow…
and browse to the location of example 9:
<DS_HOME>\drala\dwe\custom\src\my\workflow\ex9\Example_9_Workf
low_Template.xml.
3. Select the desired workflow file then click on Open. The workflow should appear in
your workspace.
4. Go to the Attributes tab for all the tasks and make sure that they have the required
values as stated the
Using the Workflow Studio to Create and Deploy the Workflow
section.
5. Follow the workflow deployment instructions in step 7 – 11 of the
“Using the
Workflow Studio to Create and Deploy the Workflow”
section.
Copyright © 2003-2006 Xerox Corporation. All Rights Reserved.
Enterprise Workflow
docushare.dse@xerox.com
9 of 9