DocuShare
Installation Guide
Publication date: April 2006
This document supports DocuShare Release 5/DocuShare CPX Release 5.
Prepared by:
Xerox Corporation
DocuShare Business Unit
3400 Hillview Avenue
Palo Alto, California 94304
USA
Copyright © 2006 Xerox Corporation. All Rights Reserved. Xerox ® and DocuShare® are trademarks of
Xerox Corporation. All other trademarks are the property of their respective companies and are hereby
acknowledged.
DocuShare Installation Guide
iii
Table of Contents
Chapter 1 Welcome to DocuShare
About DocuShare . . . . . . . . . . . . . . . . . . . . . . . . . . . . . . . . . . . . . . . . . . . . . . . . . . . . . . . . . . . . . . . 1–2
Server types . . . . . . . . . . . . . . . . . . . . . . . . . . . . . . . . . . . . . . . . . . . . . . . . . . . . . . . . . . . . . . . . 1–2
DocuShare client requirements . . . . . . . . . . . . . . . . . . . . . . . . . . . . . . . . . . . . . . . . . . . . . . . . . 1–2
Licensing. . . . . . . . . . . . . . . . . . . . . . . . . . . . . . . . . . . . . . . . . . . . . . . . . . . . . . . . . . . . . . . . . . . . . . 1–3
United States and Canada . . . . . . . . . . . . . . . . . . . . . . . . . . . . . . . . . . . . . . . . . . . . . . . . . . . . . 1–3
Europe . . . . . . . . . . . . . . . . . . . . . . . . . . . . . . . . . . . . . . . . . . . . . . . . . . . . . . . . . . . . . . . . . . . . 1–3
Asia Pacific . . . . . . . . . . . . . . . . . . . . . . . . . . . . . . . . . . . . . . . . . . . . . . . . . . . . . . . . . . . . . . . . . 1–3
Other Regions . . . . . . . . . . . . . . . . . . . . . . . . . . . . . . . . . . . . . . . . . . . . . . . . . . . . . . . . . . . . . . 1–3
Support . . . . . . . . . . . . . . . . . . . . . . . . . . . . . . . . . . . . . . . . . . . . . . . . . . . . . . . . . . . . . . . . . . . . . . . 1–4
Additional resources . . . . . . . . . . . . . . . . . . . . . . . . . . . . . . . . . . . . . . . . . . . . . . . . . . . . . . . . . . . . . 1–5
Chapter 2 Windows Server Installation
Preparing to install DocuShare . . . . . . . . . . . . . . . . . . . . . . . . . . . . . . . . . . . . . . . . . . . . . . . . . . . . . 2–2
System requirements . . . . . . . . . . . . . . . . . . . . . . . . . . . . . . . . . . . . . . . . . . . . . . . . . . . . . . . . . 2–2
Operating system . . . . . . . . . . . . . . . . . . . . . . . . . . . . . . . . . . . . . . . . . . . . . . . . . . . . . . . . . . . . 2–2
Web servers . . . . . . . . . . . . . . . . . . . . . . . . . . . . . . . . . . . . . . . . . . . . . . . . . . . . . . . . . . . . . . . . 2–2
Databases . . . . . . . . . . . . . . . . . . . . . . . . . . . . . . . . . . . . . . . . . . . . . . . . . . . . . . . . . . . . . . . . . 2–3
LDAP (Lightweight Directory Access Protocol) Servers . . . . . . . . . . . . . . . . . . . . . . . . . . . . . . . 2–4
Security. . . . . . . . . . . . . . . . . . . . . . . . . . . . . . . . . . . . . . . . . . . . . . . . . . . . . . . . . . . . . . . . . . . . 2–5
OpenOffice v2.0 . . . . . . . . . . . . . . . . . . . . . . . . . . . . . . . . . . . . . . . . . . . . . . . . . . . . . . . . . . . . . 2–5
Installing DocuShare on a Windows server . . . . . . . . . . . . . . . . . . . . . . . . . . . . . . . . . . . . . . . . . . . 2–6
Upgrading to DocuShare 5 . . . . . . . . . . . . . . . . . . . . . . . . . . . . . . . . . . . . . . . . . . . . . . . . . . . . . . . 2–15
Uninstalling DocuShare. . . . . . . . . . . . . . . . . . . . . . . . . . . . . . . . . . . . . . . . . . . . . . . . . . . . . . . . . . 2–18
Configuring SSL for IIS web server. . . . . . . . . . . . . . . . . . . . . . . . . . . . . . . . . . . . . . . . . . . . . . . . . 2–19
Closing the Tomcat servlet port. . . . . . . . . . . . . . . . . . . . . . . . . . . . . . . . . . . . . . . . . . . . . . . . . . . . 2–21
Configuring for auto login . . . . . . . . . . . . . . . . . . . . . . . . . . . . . . . . . . . . . . . . . . . . . . . . . . . . . . . . 2–22
Connecting to your DocuShare server . . . . . . . . . . . . . . . . . . . . . . . . . . . . . . . . . . . . . . . . . . . . . . 2–24
DocuShare login . . . . . . . . . . . . . . . . . . . . . . . . . . . . . . . . . . . . . . . . . . . . . . . . . . . . . . . . . . . . 2–24
PDF Conversion . . . . . . . . . . . . . . . . . . . . . . . . . . . . . . . . . . . . . . . . . . . . . . . . . . . . . . . . . . . . . . . 2–25
Chapter 3 Solaris/Linux Server Installation
Preparing to install DocuShare . . . . . . . . . . . . . . . . . . . . . . . . . . . . . . . . . . . . . . . . . . . . . . . . . . . . . 3–2
System requirements . . . . . . . . . . . . . . . . . . . . . . . . . . . . . . . . . . . . . . . . . . . . . . . . . . . . . . . . . 3–2
Operating systems . . . . . . . . . . . . . . . . . . . . . . . . . . . . . . . . . . . . . . . . . . . . . . . . . . . . . . . . . . . 3–2
Web servers . . . . . . . . . . . . . . . . . . . . . . . . . . . . . . . . . . . . . . . . . . . . . . . . . . . . . . . . . . . . . . . . 3–2
Databases . . . . . . . . . . . . . . . . . . . . . . . . . . . . . . . . . . . . . . . . . . . . . . . . . . . . . . . . . . . . . . . . . 3–3
LDAP (Lightweight Directory Access Protocol) Servers . . . . . . . . . . . . . . . . . . . . . . . . . . . . . . . 3–4
Security. . . . . . . . . . . . . . . . . . . . . . . . . . . . . . . . . . . . . . . . . . . . . . . . . . . . . . . . . . . . . . . . . . . . 3–5
OpenOffice v2.0 . . . . . . . . . . . . . . . . . . . . . . . . . . . . . . . . . . . . . . . . . . . . . . . . . . . . . . . . . . . . . 3–5
Installing DocuShare on a Solaris or Linux server . . . . . . . . . . . . . . . . . . . . . . . . . . . . . . . . . . . . . . 3–6
Table of Contents
iv
DocuShare Installation Guide
DocuShare download files . . . . . . . . . . . . . . . . . . . . . . . . . . . . . . . . . . . . . . . . . . . . . . . . . . . . . 3–6
Installing DocuShare . . . . . . . . . . . . . . . . . . . . . . . . . . . . . . . . . . . . . . . . . . . . . . . . . . . . . . . . . 3–6
Upgrading to DocuShare 5 . . . . . . . . . . . . . . . . . . . . . . . . . . . . . . . . . . . . . . . . . . . . . . . . . . . . . . . 3–14
Uninstalling DocuShare. . . . . . . . . . . . . . . . . . . . . . . . . . . . . . . . . . . . . . . . . . . . . . . . . . . . . . . . . . 3–17
Closing the Tomcat servlet port. . . . . . . . . . . . . . . . . . . . . . . . . . . . . . . . . . . . . . . . . . . . . . . . . . . . 3–18
Disabling the UNIX FTP service . . . . . . . . . . . . . . . . . . . . . . . . . . . . . . . . . . . . . . . . . . . . . . . . . . . 3–19
Connecting to your DocuShare server . . . . . . . . . . . . . . . . . . . . . . . . . . . . . . . . . . . . . . . . . . . . . . 3–20
DocuShare login . . . . . . . . . . . . . . . . . . . . . . . . . . . . . . . . . . . . . . . . . . . . . . . . . . . . . . . . . . . . 3–20
PDF Conversion . . . . . . . . . . . . . . . . . . . . . . . . . . . . . . . . . . . . . . . . . . . . . . . . . . . . . . . . . . . . . . . 3–21
Chapter 4 DocuShare Applications
DocuShare Windows Client . . . . . . . . . . . . . . . . . . . . . . . . . . . . . . . . . . . . . . . . . . . . . . . . . . . . . . . A–2
System requirements . . . . . . . . . . . . . . . . . . . . . . . . . . . . . . . . . . . . . . . . . . . . . . . . . . . . . . . . . A–2
DocuShare Outlook Client. . . . . . . . . . . . . . . . . . . . . . . . . . . . . . . . . . . . . . . . . . . . . . . . . . . . . . . . . A–4
System requirements . . . . . . . . . . . . . . . . . . . . . . . . . . . . . . . . . . . . . . . . . . . . . . . . . . . . . . . . . A–4
PaperPort Link to DocuShare . . . . . . . . . . . . . . . . . . . . . . . . . . . . . . . . . . . . . . . . . . . . . . . . . . . . . . A–6
PaperPort versions . . . . . . . . . . . . . . . . . . . . . . . . . . . . . . . . . . . . . . . . . . . . . . . . . . . . . . . . . . . A–6
System requirements . . . . . . . . . . . . . . . . . . . . . . . . . . . . . . . . . . . . . . . . . . . . . . . . . . . . . . . . . A–6
Appendix A Web Servers
Apache web server . . . . . . . . . . . . . . . . . . . . . . . . . . . . . . . . . . . . . . . . . . . . . . . . . . . . . . . . . . . . . . B–2
Compiling Apache 1.3.31 . . . . . . . . . . . . . . . . . . . . . . . . . . . . . . . . . . . . . . . . . . . . . . . . . . . . . . B–2
Compiling Apache 2.0.50 . . . . . . . . . . . . . . . . . . . . . . . . . . . . . . . . . . . . . . . . . . . . . . . . . . . . . . B–2
Installing Apache for DocuShare on Linux . . . . . . . . . . . . . . . . . . . . . . . . . . . . . . . . . . . . . . . . . . . . B–4
Installing Apache 2.0.50 . . . . . . . . . . . . . . . . . . . . . . . . . . . . . . . . . . . . . . . . . . . . . . . . . . . . . . . B–4
Configuring the Apache connection . . . . . . . . . . . . . . . . . . . . . . . . . . . . . . . . . . . . . . . . . . . . . . B–4
Installing Apache for DocuShare on Solaris . . . . . . . . . . . . . . . . . . . . . . . . . . . . . . . . . . . . . . . . . . . B–7
Installing Apache 1.3.31 . . . . . . . . . . . . . . . . . . . . . . . . . . . . . . . . . . . . . . . . . . . . . . . . . . . . . . . B–7
Installing Apache 2.0.50 . . . . . . . . . . . . . . . . . . . . . . . . . . . . . . . . . . . . . . . . . . . . . . . . . . . . . . . B–7
Configuring the Apache connection . . . . . . . . . . . . . . . . . . . . . . . . . . . . . . . . . . . . . . . . . . . . . . B–7
Installing Apache for DocuShare on Windows . . . . . . . . . . . . . . . . . . . . . . . . . . . . . . . . . . . . . . . . . B–9
Installing Apache 1.3.31 . . . . . . . . . . . . . . . . . . . . . . . . . . . . . . . . . . . . . . . . . . . . . . . . . . . . . . . B–9
Installing Apache 2.0.50 . . . . . . . . . . . . . . . . . . . . . . . . . . . . . . . . . . . . . . . . . . . . . . . . . . . . . . . B–9
Configuring the Apache connection . . . . . . . . . . . . . . . . . . . . . . . . . . . . . . . . . . . . . . . . . . . . . . B–9
Sun Java Web Server . . . . . . . . . . . . . . . . . . . . . . . . . . . . . . . . . . . . . . . . . . . . . . . . . . . . . . . . . . . B–11
Configuring Sun Java for DocuShare on Windows . . . . . . . . . . . . . . . . . . . . . . . . . . . . . . . . . B–11
Configuring Sun Java for DocuShare on Linux . . . . . . . . . . . . . . . . . . . . . . . . . . . . . . . . . . . . B–12
Configuring Sun Java for DocuShare on Solaris . . . . . . . . . . . . . . . . . . . . . . . . . . . . . . . . . . . B–14
IIS Web server . . . . . . . . . . . . . . . . . . . . . . . . . . . . . . . . . . . . . . . . . . . . . . . . . . . . . . . . . . . . . . . . B–16
Installing the IIS Web server. . . . . . . . . . . . . . . . . . . . . . . . . . . . . . . . . . . . . . . . . . . . . . . . . . . B–16
Appendix B Databases
PostgreSQL on Linux . . . . . . . . . . . . . . . . . . . . . . . . . . . . . . . . . . . . . . . . . . . . . . . . . . . . . . . . . . . . C–2
Table of Contents
DocuShare Installation Guide
v
Verifying PostgreSQL . . . . . . . . . . . . . . . . . . . . . . . . . . . . . . . . . . . . . . . . . . . . . . . . . . . . . . . . . C–2
Installing PostgreSQL with the compiled version . . . . . . . . . . . . . . . . . . . . . . . . . . . . . . . . . . . . C–3
Installing PostgreSQL with the source version . . . . . . . . . . . . . . . . . . . . . . . . . . . . . . . . . . . . . . C–3
Linux TCP/IP Connectivity . . . . . . . . . . . . . . . . . . . . . . . . . . . . . . . . . . . . . . . . . . . . . . . . . . . . . C–5
PostgreSQL on Solaris . . . . . . . . . . . . . . . . . . . . . . . . . . . . . . . . . . . . . . . . . . . . . . . . . . . . . . . . . . . C–6
Verifying PostgreSQL . . . . . . . . . . . . . . . . . . . . . . . . . . . . . . . . . . . . . . . . . . . . . . . . . . . . . . . . . C–6
Installing PostgreSQL with the compiled version . . . . . . . . . . . . . . . . . . . . . . . . . . . . . . . . . . . . C–6
Installing PostgreSQL with the source version . . . . . . . . . . . . . . . . . . . . . . . . . . . . . . . . . . . . . . C–7
Shared memory . . . . . . . . . . . . . . . . . . . . . . . . . . . . . . . . . . . . . . . . . . . . . . . . . . . . . . . . . . . . . C–9
Solaris TCP/IP Connectivity . . . . . . . . . . . . . . . . . . . . . . . . . . . . . . . . . . . . . . . . . . . . . . . . . . . . C–9
PostgreSQL with DocuShare on Windows . . . . . . . . . . . . . . . . . . . . . . . . . . . . . . . . . . . . . . . . . . . C–11
Verifying PostgreSQL . . . . . . . . . . . . . . . . . . . . . . . . . . . . . . . . . . . . . . . . . . . . . . . . . . . . . . . . C–11
Windows TCP/IP Connectivity . . . . . . . . . . . . . . . . . . . . . . . . . . . . . . . . . . . . . . . . . . . . . . . . . C–11
Oracle database . . . . . . . . . . . . . . . . . . . . . . . . . . . . . . . . . . . . . . . . . . . . . . . . . . . . . . . . . . . . . . . C–12
Tablespace creation script example . . . . . . . . . . . . . . . . . . . . . . . . . . . . . . . . . . . . . . . . . . . . . C–13
Recommended database settings . . . . . . . . . . . . . . . . . . . . . . . . . . . . . . . . . . . . . . . . . . . . . . C–13
User privileges . . . . . . . . . . . . . . . . . . . . . . . . . . . . . . . . . . . . . . . . . . . . . . . . . . . . . . . . . . . . . C–13
DB2 . . . . . . . . . . . . . . . . . . . . . . . . . . . . . . . . . . . . . . . . . . . . . . . . . . . . . . . . . . . . . . . . . . . . . . . . . C–15
Tablespace creation script example . . . . . . . . . . . . . . . . . . . . . . . . . . . . . . . . . . . . . . . . . . . . . C–15
Recommended database settings . . . . . . . . . . . . . . . . . . . . . . . . . . . . . . . . . . . . . . . . . . . . . . C–16
Creating DocuShare Tablespace . . . . . . . . . . . . . . . . . . . . . . . . . . . . . . . . . . . . . . . . . . . . . . . . . . C–17
Upgrading PostgreSQL. . . . . . . . . . . . . . . . . . . . . . . . . . . . . . . . . . . . . . . . . . . . . . . . . . . . . . . . . . C–18
Appendix C DocuShare Add-ons
Email Agent. . . . . . . . . . . . . . . . . . . . . . . . . . . . . . . . . . . . . . . . . . . . . . . . . . . . . . . . . . . . . . . . . . . . D–2
Enabling Email Agent on DocuShare . . . . . . . . . . . . . . . . . . . . . . . . . . . . . . . . . . . . . . . . . . . . . D–2
Digital certificates . . . . . . . . . . . . . . . . . . . . . . . . . . . . . . . . . . . . . . . . . . . . . . . . . . . . . . . . . . . . D–2
Email encryption . . . . . . . . . . . . . . . . . . . . . . . . . . . . . . . . . . . . . . . . . . . . . . . . . . . . . . . . . . . . . D–3
Archive Server. . . . . . . . . . . . . . . . . . . . . . . . . . . . . . . . . . . . . . . . . . . . . . . . . . . . . . . . . . . . . . . . . . D–4
Enabling Archive Client on DocuShare . . . . . . . . . . . . . . . . . . . . . . . . . . . . . . . . . . . . . . . . . . . D–4
Installing the DocuShare Archive server. . . . . . . . . . . . . . . . . . . . . . . . . . . . . . . . . . . . . . . . . . . D–4
Records Manager . . . . . . . . . . . . . . . . . . . . . . . . . . . . . . . . . . . . . . . . . . . . . . . . . . . . . . . . . . . . . . . D–6
Enabling Records Manager on DocuShare . . . . . . . . . . . . . . . . . . . . . . . . . . . . . . . . . . . . . . . . D–6
Content Encryption . . . . . . . . . . . . . . . . . . . . . . . . . . . . . . . . . . . . . . . . . . . . . . . . . . . . . . . . . . . . . . D–8
Enabling Content Encryption on DocuShare . . . . . . . . . . . . . . . . . . . . . . . . . . . . . . . . . . . . . . . D–8
Glossary
Table of Contents
vi
DocuShare Installation Guide
DocuShare Installation Guide
1–1
Welcome to DocuShare
DocuShare is a web-based document management application that enables workgroups and document
intensive businesses to dynamically capture, manage, retrieve, and distribute information. With
DocuShare, users can create their own accounts and add or delete information without a webmaster or
site administrator.
This chapter contains the following:
•
About DocuShare . . . . . . . . . . . . . . . . . . . . . . . . . . . . . . . . . . . . . . . . . . . . . . . . . . . . . . . . . . . . 1–2
•
Licensing. . . . . . . . . . . . . . . . . . . . . . . . . . . . . . . . . . . . . . . . . . . . . . . . . . . . . . . . . . . . . . . . . . . 1–3
•
Support . . . . . . . . . . . . . . . . . . . . . . . . . . . . . . . . . . . . . . . . . . . . . . . . . . . . . . . . . . . . . . . . . . . . 1–4
•
Additional resources . . . . . . . . . . . . . . . . . . . . . . . . . . . . . . . . . . . . . . . . . . . . . . . . . . . . . . . . . . 1–5
About DocuShare
Welcome to DocuShare
1–2
DocuShare Installation Guide
About DocuShare
DocuShare is a web-based document management application that stores information organized in folders
called collections. Collections can contain other DocuShare objects such as files, calendars, bulletin
boards, URLs, and other collections. Any of these DocuShare objects can appear in mutliple collections at
once and can be quickly located by using the various DocuShare navigation and search features.
Server types
DocuShare can be installed on the following platforms:
•
Windows 2000 Server with SP4 and IIS 5 http server
•
Windows 2003 Server with SP1 and IIS 6 http server
•
Sun Solaris 9, 10
•
Red Hat Enterprise Linux ES4
DocuShare client requirements
Once DocuShare is installed on a networked server, users can access the shared information from any
web browser equipped client workstation with access to the network server. Web browsers that are
supported:
•
Netscape Navigator 6.x or higher
•
Internet Explorer 5.5 SP2, 6 SP1, or 7
•
Mozilla Firefox 1.7.1 or Mozilla Firefox 1.0.7
•
Opera 7.52
•
Apple Safari 1.2.3 or higher
With DocuShare Windows Client software or the optional DocuShare Outlook Client software, DocuShare
can be accessed with Windows Explorer or Microsoft Outlook.
Welcome to DocuShare
Licensing
DocuShare Installation Guide
1–3
Licensing
DocuShare is distributed as a restricted use evaluation server. A 30-day license is required for the
evaluation period and can be obtained at http://docushare.xerox.com/ds/ds-trial.htm.
If you have purchased DocuShare, you can disable the 30-day restriction by acquiring a DocuShare
license.
United States and Canada
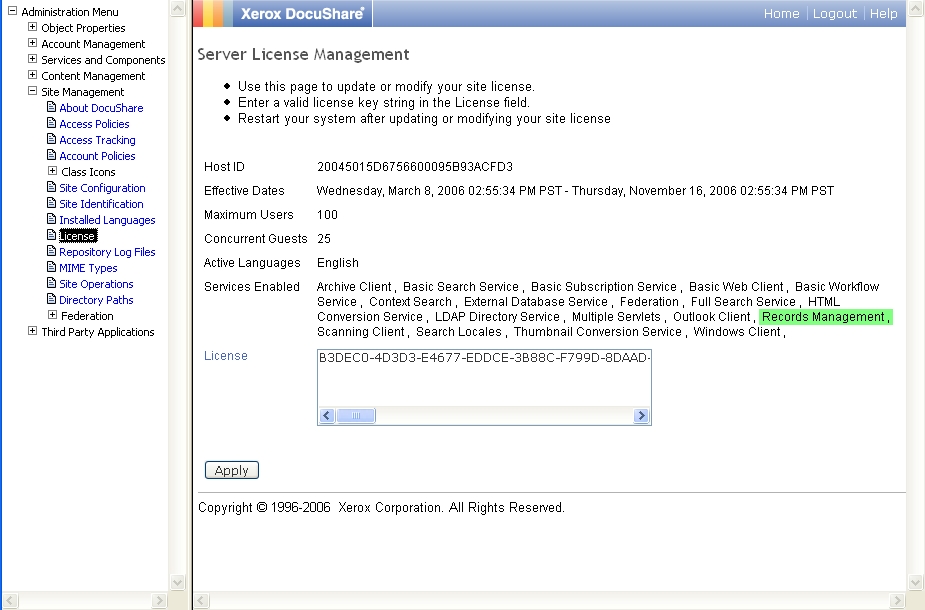
To obtain a DocuShare license, login as a DocuShare administrator and obtain the DocuShare Server ID
from the
Site Management | Server License Management
page. Email the Server ID along with the
number of seats and your customer information to the Xerox Teleweb Center at
docushare.licenses@xerox.com or call 1-800-735-7749 (option 2) and a DocuShare license will be
generated and sent to you.
Note:
Due to the length of the new licensing strings, licenses can only be emailed to customers.
Europe
To obtain a DocuShare license, login as a DocuShare administrator and obtain the DocuShare Server ID
from the
Site Management | Server License Management
page. Send your Server ID and customer
information to your local Xerox DocuShare reseller or distributor. The Xerox License Administrator will
email your DocuShare license via your local Xerox DocuShare reseller or distributor.
Asia Pacific
To obtain a DocuShare license, login as a DocuShare administrator and obtain the DocuShare Server ID
from the
Site Management | Server License Management
page. Send your Server ID and customer
information to your local Xerox DocuShare reseller or distributor. The Xerox License Administrator will
email your DocuShare license via your local Xerox DocuShare reseller or distributor.
Other Regions
To obtain a DocuShare license, login as a DocuShare administrator and obtain the DocuShare Server ID
from the
Site Management | Server License Management
page. Send your Server ID and customer
information to your local Xerox DocuShare reseller or distributor. The Xerox License Administrator will
email your DocuShare license via your local Xerox DocuShare reseller or distributor.
Support
Welcome to DocuShare
1–4
DocuShare Installation Guide
Support
Xerox offers installation and technical phone support to DocuShare customers at no additional cost for 30
days from installation. The DocuShare Web site at http://docushare.xerox.com provides online support
information, current information about updates, and other resources available for download.
If you require technical assistance installing or using DocuShare:
•
For the U.S., contact the Xerox Customer Support team through the web site, call 1-800-835-
9013, or visit http://docushare.xerox.com/support/.
Customer Support representatives are available Monday through Friday from 9 AM-7 PM, Eastern
Time.
•
For Canada, call 1-800-93-XEROX or visit the web site at http://www.xerox.ca.
•
For Europe, contact your local Xerox DocuShare reseller or distributor for support or go to the
DocuShare Web site at http://docushare.xerox.com/support/ for support information.
•
For other regions, contact your local Xerox DocuShare reseller or distributor for support or go to
the DocuShare Web site at http://docushare.xerox.com/support/ for support information.
Welcome to DocuShare
Additional resources
DocuShare Installation Guide
1–5
Additional resources
In addition to the online help, the following information is available to help you work with DocuShare.
Resource Name
Description
DocuShare User Tutorial
DocuShare CPX Tutorial
Provides brief overviews and procedures on
DocuShare basic functions—available online in
HTML from the DocuShare
Help
page.
DocuShare Administrator Tutorial
Provides brief overviews and procedures on
DocuShare basic administrative functions—
available online in HTML from the DocuShare
Administration
Help
page.
DocuShare User Guide
DocuShare CPX User Guide
Provides in-depth description of all DocuShare
features—available in PDF from the DocuShare
Help
page.
DocuShare Administrator Guide
Provides in-depth description of all DocuShare
administrator functions—available in PDF from the
DocuShare Administration
Help
page.
VDF Reference Guide
Provides the template building mechanism to
customize the DocuShare web page—available in
PDF from the DocuShare Administration
Help
page.
Command Line Utilities Guide
Provides information for using the command line
interface to administer DocuShare object and
server properties—available in PDF from the
DocuShare Administration
Help
page.
LDAP and Active Directory Guide
Provides information to administer LDAP and
Active Directory specific to the DocuShare
server—available in PDF from the DocuShare
Administration
Help
page.
DocuShare Release Notes
Describes features and known problems with this
release. On the server home page, click
About
DocuShare
and click
Release Notes
.
Additional resources
Welcome to DocuShare
1–6
DocuShare Installation Guide
DocuShare Installation Guide
2–1
Windows Server Installation
This chapter contains the following:
•
Preparing to install DocuShare . . . . . . . . . . . . . . . . . . . . . . . . . . . . . . . . . . . . . . . . . . . . . . . . . . 2–2
•
Installing DocuShare on a Windows server . . . . . . . . . . . . . . . . . . . . . . . . . . . . . . . . . . . . . . . . 2–6
•
Upgrading to DocuShare 5 . . . . . . . . . . . . . . . . . . . . . . . . . . . . . . . . . . . . . . . . . . . . . . . . . . . . 2–15
•
Uninstalling DocuShare. . . . . . . . . . . . . . . . . . . . . . . . . . . . . . . . . . . . . . . . . . . . . . . . . . . . . . . 2–18
•
Configuring SSL for IIS web server. . . . . . . . . . . . . . . . . . . . . . . . . . . . . . . . . . . . . . . . . . . . . . 2–19
•
Closing the Tomcat servlet port. . . . . . . . . . . . . . . . . . . . . . . . . . . . . . . . . . . . . . . . . . . . . . . . . 2–21
•
Configuring for auto login . . . . . . . . . . . . . . . . . . . . . . . . . . . . . . . . . . . . . . . . . . . . . . . . . . . . . 2–22
•
Connecting to your DocuShare server . . . . . . . . . . . . . . . . . . . . . . . . . . . . . . . . . . . . . . . . . . . 2–24
•
PDF Conversion . . . . . . . . . . . . . . . . . . . . . . . . . . . . . . . . . . . . . . . . . . . . . . . . . . . . . . . . . . . . 2–25
Preparing to install DocuShare
Windows Server Installation
2–2
DocuShare Installation Guide
Preparing to install DocuShare
The DocuShare 5 server can be configured to work with several types of hardware and software. Use this
pre-installation checklist to prepare your server for DocuShare installation.
System requirements
DocuShare 5 installation on a Windows server requires the following:
‰
1.3 GHz Intel Pentium 4 or AMD Athlon MP processor or greater
‰
2 GB free disk space or greater
‰
2 GB RAM or greater
Operating system
‰
Windows 2000 Server with SP 4 and IIS 5
‰
Windows 2003 Server with SP 1 and IIS 6
‰
Windows Small Business Server 2003 (SBS)
Tech Note:
DocuShare is tested to only support 32-bit systems.
Web servers
DocuShare requires a web servlet or server as part of its functionality. DocuShare includes a web servlet
or can be configured to use one of the following web servers.
‰
Microsoft IIS 5, 6—the web server must be installed and running before installing DocuShare.
‰
Apache 2.0.50 or higher on Windows 2000 or 2003 server
‰
Apache 1.3.31 on Solaris 8 or 9—the web server must be installed and running before installing
DocuShare.
‰
SunOne/Sun Java System Web Server 6.1 on Windows 2000 Server; Solaris 9; Red Hat Enterprise
Linux 3; or SUSE Linux Server v.8—the web server must be installed and running before installing
DocuShare.
See Appendix B, Web Servers for configuring one of the web servers.
Windows Server Installation
Preparing to install DocuShare
DocuShare Installation Guide
2–3
Databases
DocuShare uses a database as part of its functionality. DocuShare can be configured to use MSDE, SQL
Server, Oracle, and PostgreSQL databases.
‰
MSDE 2000 SP4 (Microsoft SQL Server Desktop Engine)—is included in the DocuShare 5 installation
program. If MSDE is not installed on your system, the DocuShare 5 installer can install MSDE 2000.
Refer to the Microsoft website for the latest service packs and hot fixes for MSDE 2000 or to Support
on page 1–4 for Xerox support information.
‰
SQL Server 2000 SP4, 2005—SQL Server must be installed and functioning (database established).
You can create and define the DocuShare database.
Note:
DocuShare Release 5/CPX Release 5 with Records Manager requires SQL Server 2000
DocuShare CPX Release 5 with XDB requires SQL Server 2005
To connect DocuShare to the database, obtain the following information from your database
administrator before installing DocuShare.
•
Database User Name
•
Database User Password
•
Database Port
•
Tablespace Name
•
Database Host Name
See Appendix C, Databases for a typical DocuShare tablespace creation script.
On your Windows server:
•
Set the SQLServer for
SQL Server and Windows authentication only
. DocuShare 5 does
not support
Windows only authentication
at this time.
•
Set the SQLServer maximum memory usage to 50% of your server’s physical RAM, if you are
using SQLServer on the same system as DocuShare.
On your SQL server:
In the New Database dialog window, set the Collation name to
SQL_Latin1_General_CP1_CI_AS
where:
•
CI is case insensitive; CS is case sensitive
•
AI is accent insensitive; AS is accent sensitive
‰
Oracle v9i, v10g—the database must be installed and functioning. You can create and define the
Oracle tablespace or if selected, can be created and defined by the DocuShare installer. Oracle 9.2.0
should have the Server Patch Set 9.2.0.6 installed.
Note:
DocuShare Release 5/CPX Release 5 with Records Manager requires Oracle v9i
Preparing to install DocuShare
Windows Server Installation
2–4
DocuShare Installation Guide
Caution: If your system will be operating with multibyte characters, ensure that your database
character encoding is set to AL32UTF8. Refer to your Oracle database documentation for
details.
To connect DocuShare to the database, obtain the following information from your database
administrator before installing DocuShare.
•
Database User Name
•
Database User Password
•
Database Port
•
Tablespace Name
•
Database SID
•
Database Host Name
See Oracle database on page C–12 for a typical DocuShare tablespace creation script.
Tech Note:
Oracle v.9i, the CLOB datatype must be
enabled
and the No Sort option
disabled
to work
with DocuShare. Check the DocuShare Knowledge Base at http://www.xerox.com/docushare/
support for details.
‰
DB2 v8.2—the database must be installed and functioning. You can create and define the DB2
tablespace or if selected, can be created and defined by the DocuShare installer.
To connect DocuShare to the database, obtain the following information from your database
administrator before installing DocuShare.
•
Database User Name
•
Database User Password
•
Database Port
•
Regular tablespace Name; System temporary tablespace; Large tablespace name (optional);
Index tablespace name (optional)—all tablespaces must have 32K bufferpools.
•
Database SID
•
Database Host Name
See DB2 on page C–15 for a typical DocuShare tablespace creation script.
LDAP (Lightweight Directory Access Protocol) Servers
‰
SunOne/Sun Java Directory Server 5.2 and S5.1 with SP1
‰
Microsoft Active Directory on Windows 2000 Server SP3
‰
Microsoft 2003 Server with current updates
‰
Novell eDirectory v8.7.3.7 (version 8.7.3 with Patch 7)
Windows Server Installation
Preparing to install DocuShare
DocuShare Installation Guide
2–5
Security
Scanning
The DocuShare installation has a Scan-to-DocuShare via FTP option. An internal FTP server is installed
when the Scan-to-DocuShare via FTP option is selected for installation.
Caution: If your environment prohibits installing an FTP server for security reasons, select the
Typical DocuShare Server install without the FTP scan feature (default).
Secure Sockets Layer (SSL)
SSL provides a secured communication layer between the IIS web server and client web browsers. SSL
functionality is provided by the web server. To achieve SSL connectivity for DocuShare, you must enable
SSL for the IIS web server and shut off the Tomcat servlet port.
To enable SSL for the IIS web server, see Configuring SSL for IIS web server on page 2–19. To close the
Tomcat servlet port, see Closing the Tomcat servlet port on page 2–21.
OpenOffice v2.0
If you are licensed to use PDF Conversion on DocuShare, you need to download, install, and start
OpenOffice on your server. See PDF Conversion on page 2–25.
Note:
DocuShare PDF Conversion feature on a Windows server only works with OpenOffice v2.0.
Installing DocuShare on a Windows server
Windows Server Installation
2–6
DocuShare Installation Guide
Installing DocuShare on a Windows server
1. Log into the server as a Windows server administrator.
Tech Note:
To monitor the DocuShare installation, initial installation activity is recorded in a
log.txt
file
located in the directory, C:..\Temp for the Windows server administrator. When the DocuShare
directory is created by the installer, a new log.txt file in the DocuShare home directory
continues recording the remaining installation activities.
Optional for DocuShare installation: to preserve configuration and installation data at the
completion of the DocuShare installation, start the installation in a Command Prompt window:
docushare.exe -P docushareLog.cleanUp=false
2. To start the DocuShare installation.
a. Insert the DocuShare CD-ROM into the server CD-ROM drive. The DocuShare setup should
start automatically. If you have disabled AutoRun, double-click
setup.bat
in the CD root direc-
tory. The DocuShare Install Menu displays.
b. If you downloaded DocuShare from the web into a temporary directory, to launch the installer,
enter
docushare.exe
in the Run window.
Tech Note:
To install DocuShare via a Command Prompt window only, enter the following:
docushare -is:javaconsole -console
Note:
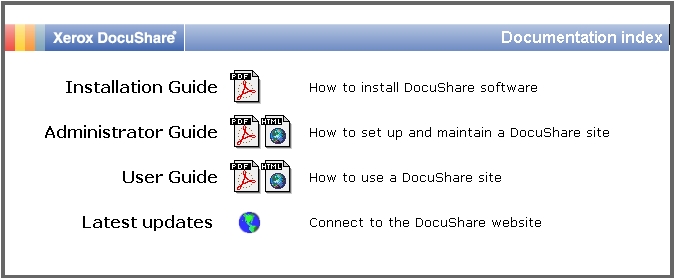
If this is a first time DocuShare install, it is recommended that you read the
DocuShare Installation
Guide
before starting the installation. Click
View Documentation
to view or print the Installation
Guide from the Documentation Index page.
The DocuShare Release 5/CPX Release 5 installation are similar. The following installation
procedure and screens are for installing DocuShare 5.0.
Windows Server Installation
Installing DocuShare on a Windows server
DocuShare Installation Guide
2–7
3. Click
Install DocuShare
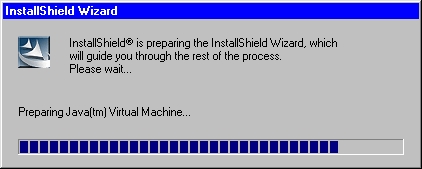
on the DocuShare Install Menu to begin the installation.
The installation program uses Java to install the product. It takes a few minutes to unpack and
install the Java files.
An onscreen status indicator is not available while JVM completes its installation. The DocuShare
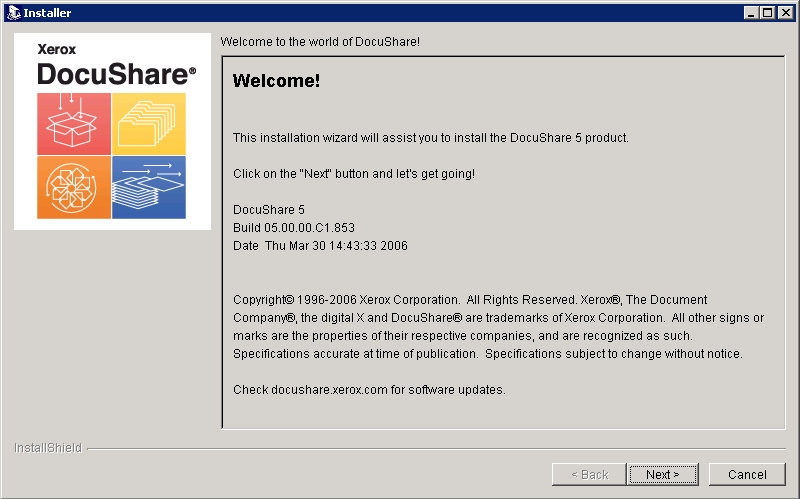
Welcome screen displays at the completion of the Java installation.
4. Click
Next
to start the DocuShare installation. Follow the onscreen instructions.
Installing DocuShare on a Windows server
Windows Server Installation
2–8
DocuShare Installation Guide
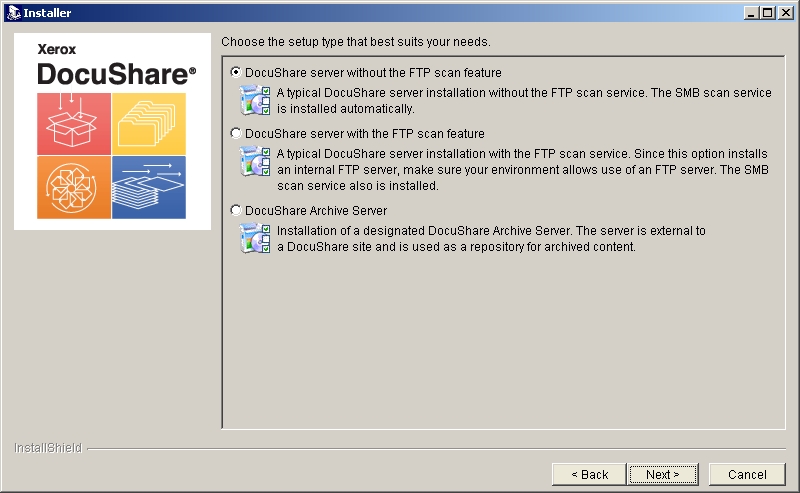
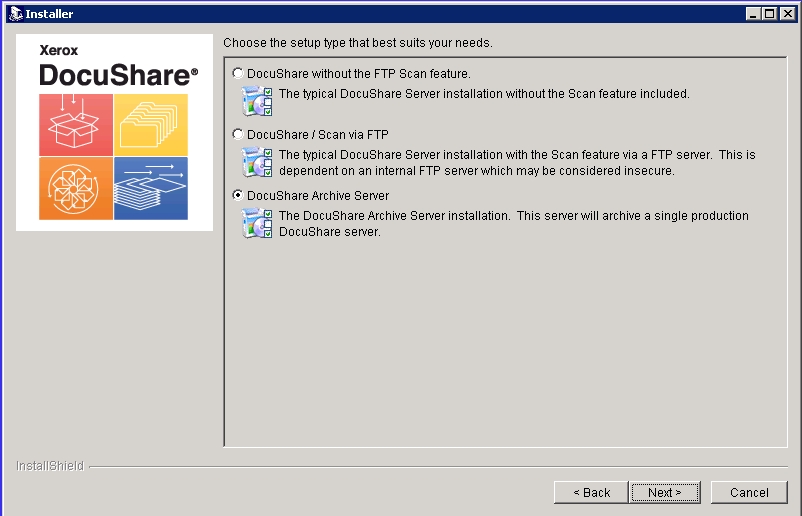
5. When the DocuShare Installation options window displays, select the option to install DocuShare.
Caution: The full DocuShare installation has Scan-to-DocuShare capability which utilizes an FTP
server port to receive documents. If your environment prohibits installing an FTP server
for security reasons, select the default to install DocuShare without the FTP scan feature.
6. Click
Next
and follow the onscreen instructions.
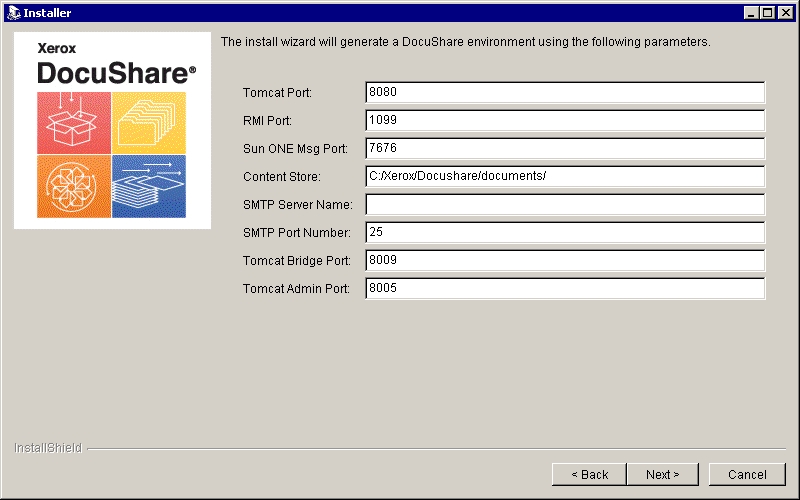
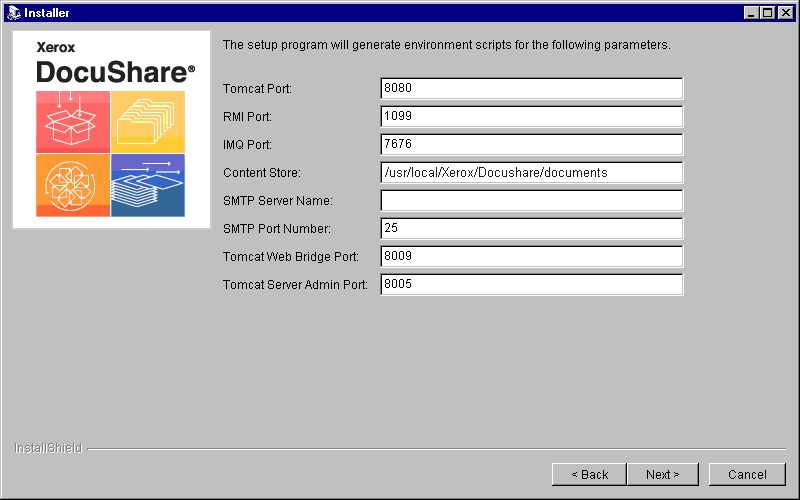
7. When the DocuShare Install Parameters window displays, make any changes to the parameters
or click
Next
to accept the default settings. DocuShare requires 9 TCP ports.
•
Tomcat port—designated port for the Tomcat servlet (default port: 8080)
•
RMI port—designated port for the RMI server (default port: 1090)
•
SunOne Msg port—designated port for the IMQ JMS server port number (default port: 7676)
•
Content store—designated directory location for document repository
•
SMTP Server Name—fully qualified DNS name for the SMTP mail server
•
SMTP Port Number—designated port for the SMTP server (default port: 25)
•
Tomcat Web Bridge Port—designated port for the Tomcat Web Bridge (default port: 8009)
•
Tomcat Server Admin Port—designated port for the Tomcat Web servlet (default port: 8005)
Windows Server Installation
Installing DocuShare on a Windows server
DocuShare Installation Guide
2–9
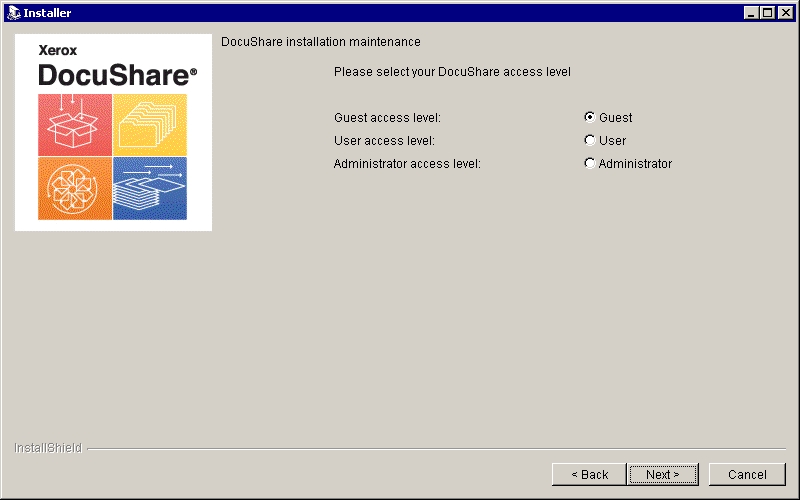
8. The Access configuration window displays. Select the option to set DocuShare access.
•
Guest
—Anyone can enter the DocuShare site (default).
•
User
—Only authenticated registered users can enter the DocuShare site.
•
Administrator
—Only site administrators can enter the DocuShare site.
Click
Next
to continue the installation.
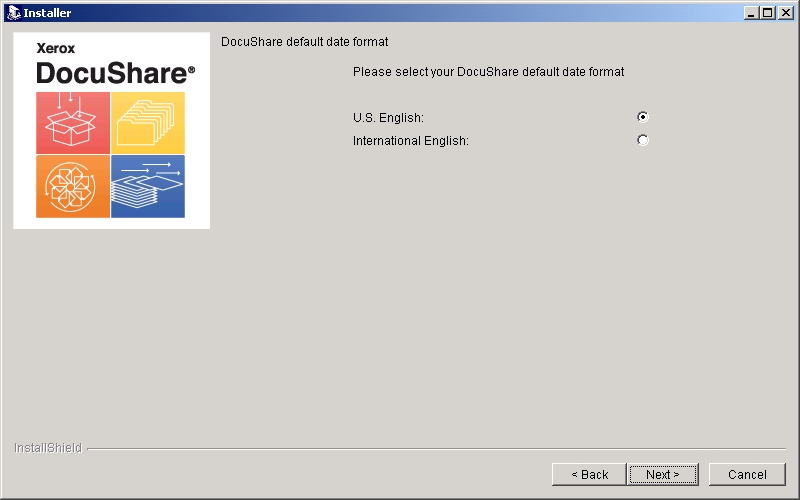
9. The Default Date Format window displays. Click to select the default date format:
•
U.S. English—mm/dd/yy
•
International English—dd/mm/yy
Click
Next
to continue the installation.
Installing DocuShare on a Windows server
Windows Server Installation
2–10
DocuShare Installation Guide
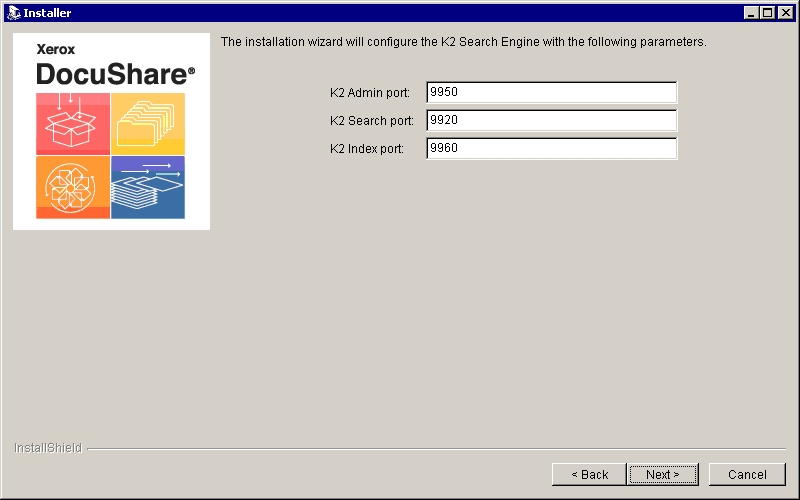
10. The K2 Search Engine port window displays. Click
Next
.
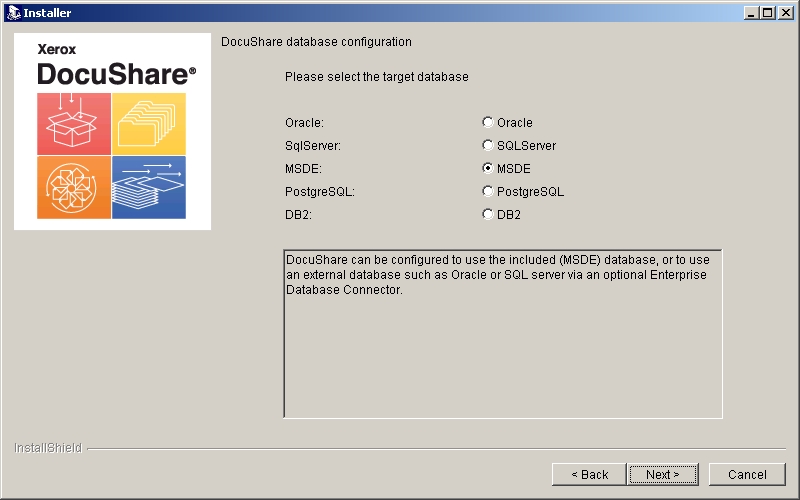
11. When the Database Configuration screen displays, select the database option for your DocuShare
site and click
Next
.
Caution: If you are using an Oracle database set for multibyte characters, ensure that you enter the
Oracle Name Instance that has the character encoding set to AL32UTF8.
Windows Server Installation
Installing DocuShare on a Windows server
DocuShare Installation Guide
2–11
12. If you are using MSDE as your DocuShare database, do the following:
a. Enter the Database User Password (required).
b. Click the checkbox to
Install MSDE
.
If MSDE 2000 is currently installed on the server that will be used by DocuShare, select
Default
Instance
or a new
Named Instance
to be created and defined by the DocuShare installer.
c. Click
Next
to continue.
13. A Reboot message may display if
Install MSDE
was selected. Click
Next
to continue.
Installing DocuShare on a Windows server
Windows Server Installation
2–12
DocuShare Installation Guide
If an older version of MSDE exists, the DocuShare installer will upgrade to MSDE 2000 and may
reboot the system. At the completion of system reboot, restart the DocuShare installation.
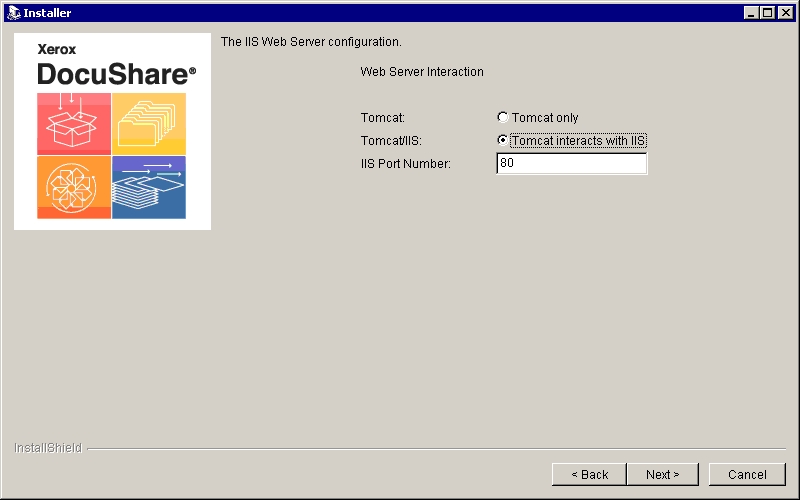
14. When the Web Server Interaction screen displays, select the web server option for your
DocuShare site.
If you are using IIS as your web server, select the option to install Tomcat/IIS web server. Running
IIS on your Windows server is recommended
15. Click
Next
to continue.
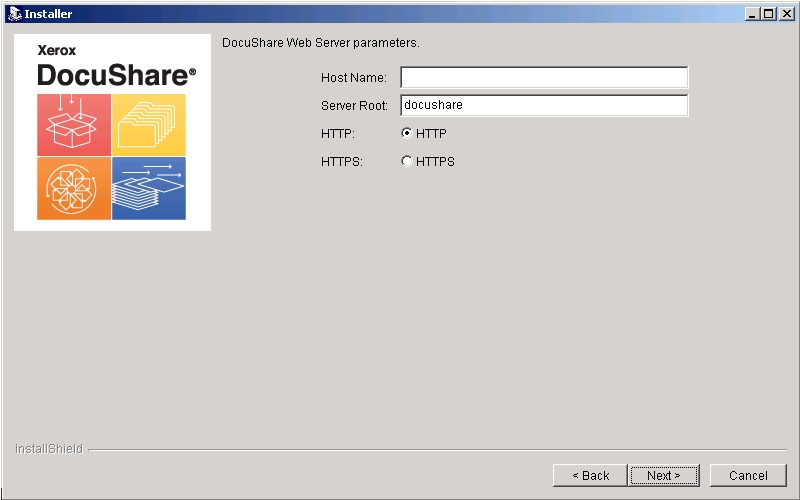
16. When the DocuShare Web server parameters window displays:
a. Enter the hostname (fully qualified DNS name, such as docushare.domain.com)
b. Server root (docushare is the default). Refer to Connecting to your DocuShare server on page
2–24
.
c. Select HTTP or HTTPS.
Caution: Select HTTPS only if your web server is configured for HTTPS service; this could
adversely affect DocuShare functionality.
Windows Server Installation
Installing DocuShare on a Windows server
DocuShare Installation Guide
2–13
17. Click
Next
to continue the installation.
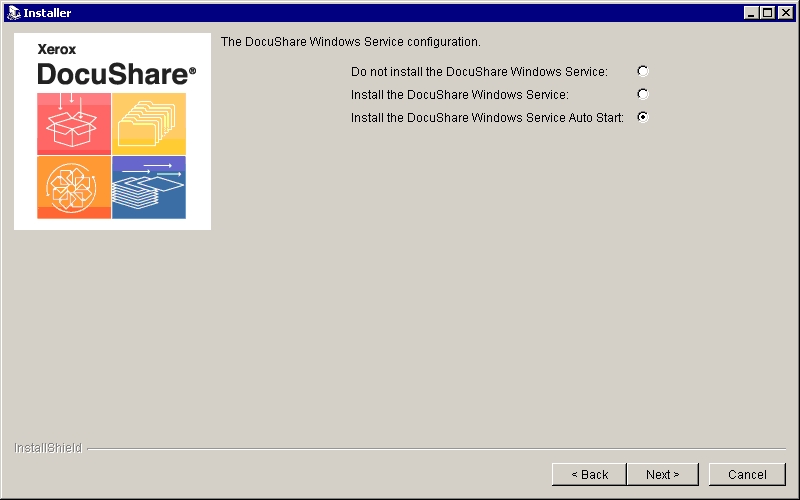
18. When the Windows Service setup window displays, select the option for the DocuShare Windows
Service.
Tech Note:
Running DocuShare as a service on your Windows server is recommended. If your
DocuShare server will be in a Cluster environment, do not select to install DocuShare
Windows Service Autostart. The Cluster Resource Group will start up DocuShare.
19. Click
Next
to continue the installation.
20. When the installer completes the DocuShare installation, click
Finish
to close the installer.
Installing DocuShare on a Windows server
Windows Server Installation
2–14
DocuShare Installation Guide
21. Reboot the system if you selected to run DocuShare as an Autostart service, otherwise enter
<DSHome>\bin\start_docushare
in a Command Prompt window to start DocuShare; or in the
Control Panel, open the Services application to select and start DocuShare.
DocuShare initial startup automatically updates the search indexes; allow five minutes before
accessing the site via a browser.
Tech Note:
If you are using IIS as your only web server, go to Closing the Tomcat servlet port on page 2–
21 to close the Tomcat servlet port.
If Scan-to-DocuShare via FTP was installed, you must stop the IIS FTP site via the IIS
Manager.
22. To license your DocuShare server:
a. Log into the DocuShare server as admin, using the password you supplied during the installa-
tion.
b. On the navigation bar, click
Admin Home
.
c. From the Administration menu, click
Site Management | License
.
d. Record or copy your server ID.
e. If this installation is for evaluation, click the link or go to:
http://docushare.xerox.com/ds/ds-trial.htm to complete the form and obtain a 30-day license.
See Licensing on page 1–3 for details obtaining a DocuShare server site license.
23. Refer to the
DocuShare Administrator Guide
to configure your DocuShare site.
Windows Server Installation
Upgrading to DocuShare 5
DocuShare Installation Guide
2–15
Upgrading to DocuShare 5
If you are upgrading from a previous version of DocuShare to DocuShare Release 5/CPX Release 5, the
DocuShare Installer includes an upgrade utility. You can upgrade your server to DocuShare Release 5/
CPX Release 5 using the DocuShare Release 5/CPX Release 5 Installer CD or from the DocuShare
Release 5/CPX Release 5 application downloaded from the web.
The DocuShare upgrade utility upgrades the following DocuShare Releases:
•
3.1 Update 2 and higher
•
DocuShare 4.0.1 and higher
To check your DocuShare version, click
About DocuShare
on the Home page.
Note:
To monitor the DocuShare upgrade, installation and upgrade activity is recorded in a
log.txt
file
located in the DocuShare home directory.
The DocuShare Release 5/CPX Release 5 upgrade are similar. The following installation procedure
and screens are for upgrading to DocuShare 5.0.
To upgrade to DocuShare Release 5/CPX Release 5:
1. Log into the server as a Windows server administrator.
2. In the Control Panel, select and open the Services application. Select
DocuShare
to stop the
server.
3. To ensure the security of your DocuShare site data, backup your database. Refer to the
DocuShare Administrator Guide
or to your database server documentation, for data backup and
restore procedures.
4. In your database server manager, stop the database for DocuShare.
5. Perform a system backup of DocuShare. Refer to the
DocuShare Administrator Guide
for system
backup.
6. Restart the database; the database must be running for the DocuShare Installer to upgrade the
database schema.
7. Exit all Windows applications before starting the DocuShare Installer Setup.
Caution: The DocuShare Installer will shutdown the IIS service during the upgrade and restart at its
completion. If IIS service is not restarted by the DocuShare Installer, enter in a Command
Prompt window: net start w3svc.
8. To start the DocuShare upgrade.
a. Insert the DocuShare CD-ROM into the server CD-ROM drive. The DocuShare setup should
start automatically. If you have disabled AutoRun, double-click
setup.bat
in the CD root direc-
tory. The DocuShare Install Menu displays.
b. If you downloaded DocuShare from the web into a temporary directory, to launch the installer,
enter
docushare.exe
in the Run window.
Upgrading to DocuShare 5
Windows Server Installation
2–16
DocuShare Installation Guide
•
Optional for DocuShare upgrade: use the command line -
P docushareLog.cleanUp=false
to
preserve configuration and upgrade data at the completion of the DocuShare upgrade.
•
To use this utility, start the upgrade in a Command Prompt window:
docushare.exe -P docushareLog.cleanUp=false
9. Click
Install DocuShare
on the DocuShare Install Menu to begin the installation.
The installation program uses Java to install the product. It takes a few minutes to unpack and
install the Java files. Click
Next
to start the DocuShare installation and follow the onscreen
instructions.
10. When the DocuShare Installation options window displays, select the option to install DocuShare.
Caution: The full DocuShare installation has Scan-to-DocuShare capability which utilizes an FTP
server port to receive documents. If your environment prohibits installing an FTP server
for security reasons, select the default to install DocuShare without the FTP scan feature.
11. Click
Next
and follow the onscreen instructions.
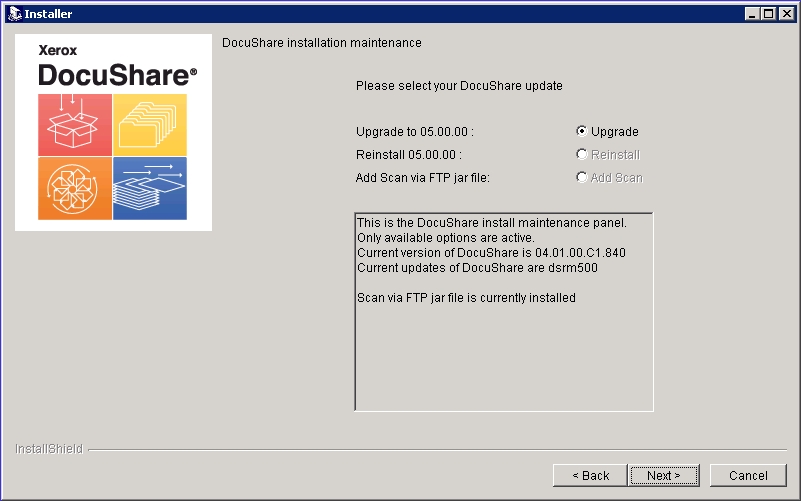
Note:
Whether the installer locates an installed DocuShare instance or that you provide an installed
DocuShare path, the installer determines the version installed and provides either the option to
upgrade or reinstall.
12. When the Upgrade Option window displays, click
Upgrade
.
13. Follow the onscreen instructions to continue the upgrade. During the upgrade process, the
DocuShare upgrade utility backs up the appropriate system server configuration and data.
14. When the installer completes the DocuShare upgrade, click
Finish
to close the installer.
Windows Server Installation
Upgrading to DocuShare 5
DocuShare Installation Guide
2–17
15. Reboot the system if you selected to run DocuShare as a service, otherwise enter the command
<DSHome>\bin\start_docushare
in a Command Prompt window to start DocuShare; or in the
Control Panel, open the Services application to select and start DocuShare.
Note:
If you are upgrading from DocuShare 4.0.x, DocuShare installer displays a DirectoryException
message and restarts DocuShare. If upgrading from DocuShare 4.1, the message does not display
and a restart does not occur.
16. Perform the database optimization task. Refer to database maintenance in the
DocuShare
Administrator Guide
for database optimization procedures. When optimization is completed,
continue to the next step.
17. Run
dsindex index_all
from the DocuShare 5 server bin directory.
Tech Note:
Customized Release 4.x or older VDF versions are not convertible to DocuShare Release 5/
CPX Release 5. Contact DocuShare Customer Support at 1-800-835-9013 or visit http://
docushare.xerox.com/ds/support_sub.html for technical assistance.
Uninstalling DocuShare
Windows Server Installation
2–18
DocuShare Installation Guide
Uninstalling DocuShare
To uninstall DocuShare Release 5/CPX Release 5 from your Windows server, use the Add/Remove
application in the server Control Panel. Uninstall will not remove the DocuShare directory that includes
your DocuShare repository content. You can do the following before uninstalling DocuShare.
•
Leave the repository in its current location.
•
Save your repository content to another storage media by using the DocuShare command line
utility,
dsexport
, prior to uninstalling DocuShare. Refer to the
DocuShare Command Line Utilities
Guide
for details.
Caution: If MSDE 2000 (Microsoft SQL Server Desktop Engine) was installed with the DocuShare
Installer, DocuShare Uninstaller will remove DocuShare and MDSE 2000. Data for all
Windows applications sharing the MSDE 2000 database should be backed up.
To uninstall DocuShare:
1. In the Control Panel, select and open the Services application.
2. Select
DocuShare
to stop the server.
3. In the Control Panel, select and open the server Add/Remove application.
4. Scroll and select
DocuShare
to uninstall the program. Follow the onscreen instructions.
5. Delete the directory in which DocuShare was installed.
Note:
Uninstall removes all installed languages, such as French, German, and Spanish.
Windows Server Installation
Configuring SSL for IIS web server
DocuShare Installation Guide
2–19
Configuring SSL for IIS web server
Secure Sockets Layer (SSL) provides an encrypted communication layer between your web server and
client web browsers. DocuShare supports SSL when used with the IIS server. SSL functionality is provided
by your web server, but DocuShare must be informed that SSL is being used so that it will supply
SSL-based addresses (https:// instead of http://). SSL may be enabled or disabled anytime after
DocuShare has been installed.
To configure SSL:
Note:
The following procedure and screens are for a Windows 2003 server. The procedure and screens
will vary for other Windows servers.
1. From the Start menu, select
Internet Information Services Manager
.
2. In the Internet Information Manager window, select
hostname (local computer) | Web Sites |
Default Web Site
.
3. Right-click the
Default Web Site
and select
Properties
. The Default Web Site Properties window
displays.
4. Click the
Directory Security
tab.
5. Click
Edit
in the Secure Communications section. The Secure Communications window displays.
Configuring SSL for IIS web server
Windows Server Installation
2–20
DocuShare Installation Guide
6. Click the
Ignore client certificates
option.
Tech Note:
If
Require secure channel (SSL)
is not checked, the DocuShare site can be accessed in a
non-secured mode.
7. Click
OK
. SSL is now configured for the IIS web server.
Windows Server Installation
Closing the Tomcat servlet port
DocuShare Installation Guide
2–21
Closing the Tomcat servlet port
During the DocuShare 5 installation, if you selected to install the IIS option on the Web Server Interaction
page, you can configure your DocuShare server for SSL by closing the Tomcat web servlet port to web
browser access.
To close the Tomcat servlet port:
1. In a Command Prompt window, check the Tomcat servlet port status using the command,
dsservice status
in the directory <DSHome>\bin.
2. Stop DocuShare by entering the command,
stop_docushare
.
Resources:
For a complete list of start_docushare commands and arguments, enter
start_docushare
help
in the Command Prompt window.
3. Enter the command,
start_docushare tomcat http off
, to close the Tomcat web servlet http port.
This action closes the port providing access to the Tomcat web servlet via a web browser.
4. Enter the command,
start_docushare tomcat http on
, to open the port to the Tomcat web
servlet. This action allows access to the Tomcat web servlet.
Tech Note:
To update only the environment, add the argument
update-only
to the end of the
start_docushare command.
5. Start DocuShare by entering the command,
start_docushare
. Reboot the system if you are using
IIS as a service.
Configuring for auto login
Windows Server Installation
2–22
DocuShare Installation Guide
Configuring for auto login
If you are enabling the DocuShare Auto Login feature to allow DocuShare Login Authentication to be
handled by the Windows Domain Authentication, you must have the Internet Information Server (IIS) web
server installed and configured to use with DocuShare.
Note:
Ensure that the DocuShare server usernames and passwords are the same as authenticated by the
web server.
The following procedure and screens are for a Windows 2003 server. The procedure and screens
will vary for other Windows servers.
To configure IIS for DocuShare Auto Login:
1. From the Start menu, select
Internet Information Services Manager
.
2. In the Internet Information Manager window, select
hostname (local computer) | Web Sites |
Default Web Site
.
3. Stop the IIS web server. Right-click the web server and select
Stop
.
4. Right-click the
Default Web Site
and select
Properties
. The Default Web Site Properties window
displays.
5. Click the
Directory Security
tab.
6. Click
Edit
in the Authentication and access control section. The Authentication Methods window
displays.
Windows Server Installation
Configuring for auto login
DocuShare Installation Guide
2–23
a. Deselect
Enable Anonymous Access
.
b. Enable
Integrated Windows authentication
.
c. Click
OK
.
7. Start the IIS web site.
8. Enable the Auto Login feature on DocuShare.
Resources:
Refer to the Getting Started chapter of the
Administrator Guide
to enable auto login.
Tech Note:
It is also possible to use auto login with a customized web server other than IIS. The web
server must be configured to set the REMOTE_USER environment variable to the username
of the user it has authenticated as follows:
REMOTE_USER = <Domain>/<username>
Connecting to your DocuShare server
Windows Server Installation
2–24
DocuShare Installation Guide
Connecting to your DocuShare server
At the completion of the DocuShare installation, try connecting to your new DocuShare server using a web
browser. The default URL is http://<fully qualified DNS name>:8080/docushare.
a. If DocuShare was installed to the home directory on your web site, the URL is:
http://<fully qualified DNS name>:<port>/docushare
b. If DocuShare was installed into a subdirectory on your web site, the URL is:
http://<fully qualified DNS name>:<port>/<subdirectory_path>/docushare
– If you specified to install IIS on your server, then the :<port> component of the URL is not
used. For example: http://<fully qualified DNS name>/docushare
– If you specified to install only Tomcat on your server, then the :<port> component of the URL is
8080 (default).
c. If you changed the server root to
root
during the installation, the /docushare (default) component
of the URL is not required. For example, http://<fully qualified DNS name> or http://<fully qualified
DNS name>:8080
If the installation was successful, you should be viewing the default home page of your new DocuShare
server. The home page has links to many useful features and to several pre-installed collections.
DocuShare login
You can log in as
admin
at this time, using the password you created during the installation. You need to
license the server to enable creating collections and adding documents to your server.
Account Creation Authority
is the default allowing all users to access the site and create their own user
accounts. Site access can be configured for limited or restricted access. Refer to the Account
Management/Access Policies section in the
DocuShare Administrator Guide
.
Resources:
Take a moment to scan the
DocuShare User
and
Administrator Tutorials
that are included on
the DocuShare Help page to familiarize yourself with DocuShare features and administration.
Windows Server Installation
PDF Conversion
DocuShare Installation Guide
2–25
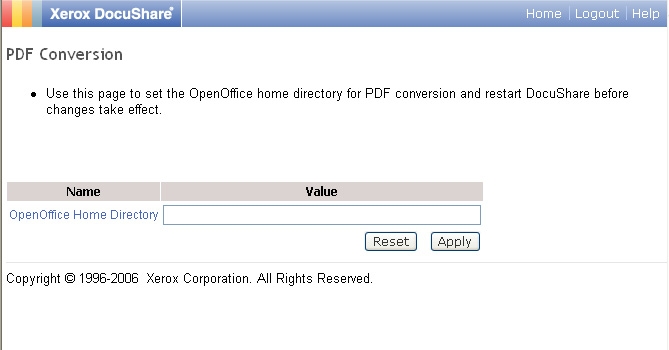
PDF Conversion
If you are licensed to use PDF Conversion on DocuShare, you need to download and install OpenOffice on
your server and set the environment to access an X Server to display vector graphics.
To install OpenOffice:
1. Go to the OpenOffice website at http://www.openoffice.org.
2. Download OpenOffice v2.0 to a temporary directory.
Note:
DocuShare PDF Conversion feature on a Windows server only works with OpenOffice v2.0.
3. Follow the installation instructions to install OpenOffice.
4. Note the pathname where OpenOffice is installed.
5. Start an OpenOffice application.
a. Click
Start | Programs | OpenOffice
.
b. Select an OpenOffice application, such as OpenOffice Writer.
c. When displayed, click to accept the License Agreement.
d. OpenOffice is set to run only for the Administrator login. To enable OpenOffice to run as part of
the system, proceed to step 6.
6. If you had selected to run DocuShare as a service, you must enable OpenOffice to interact with
DocuShare.
a. Click
Start | Programs | Administrative Tools | Services
.
b. In the Services window, right-click the
DocuShare service
and select
Properties
.
c. Click the
Log On
tab.
d. Check that
Local System account
is selected. Select
Allow service to interact with
desktop
.
e. Click
OK
.
PDF Conversion
Windows Server Installation
2–26
DocuShare Installation Guide
7. Click
Start | Programs | Administrative Tools | Services
.
8. In the Services window, right-click
DocuShare
to start as a service.
9. When displayed, click to accept the OpenOffice License Agreement. OpenOffice is now set to run
as part of the system.
10. Refer to the
DocuShare Administrator Guide
to enable DocuShare PDF conversion from the
DocuShare Administrator UI.
11. Restart DocuShare. This concludes the OpenOffice installation.
DocuShare Installation Guide
3–1
Solaris/Linux Server Installation
This chapter contains the following:
•
Preparing to install DocuShare . . . . . . . . . . . . . . . . . . . . . . . . . . . . . . . . . . . . . . . . . . . . . . . . . . 3–2
•
Installing DocuShare on a Solaris or Linux server . . . . . . . . . . . . . . . . . . . . . . . . . . . . . . . . . . . 3–6
•
Upgrading to DocuShare 5 . . . . . . . . . . . . . . . . . . . . . . . . . . . . . . . . . . . . . . . . . . . . . . . . . . . . 3–14
•
Uninstalling DocuShare. . . . . . . . . . . . . . . . . . . . . . . . . . . . . . . . . . . . . . . . . . . . . . . . . . . . . . . 3–17
•
Closing the Tomcat servlet port. . . . . . . . . . . . . . . . . . . . . . . . . . . . . . . . . . . . . . . . . . . . . . . . . 3–18
•
Disabling the UNIX FTP service . . . . . . . . . . . . . . . . . . . . . . . . . . . . . . . . . . . . . . . . . . . . . . . . 3–19
•
Connecting to your DocuShare server . . . . . . . . . . . . . . . . . . . . . . . . . . . . . . . . . . . . . . . . . . . 3–20
•
PDF Conversion . . . . . . . . . . . . . . . . . . . . . . . . . . . . . . . . . . . . . . . . . . . . . . . . . . . . . . . . . . . . 3–21
Preparing to install DocuShare
Solaris/Linux Server Installation
3–2
DocuShare Installation Guide
Preparing to install DocuShare
The DocuShare 5 server can be configured to work with several types of hardware and software. Use this
pre-installation checklist to prepare your server for DocuShare installation.
System requirements
DocuShare 5 installation on a Solaris/Linux server requires the following:
‰
Solaris—1 GHz UltraSPARC III processor
‰
Linux—1.3 GHz Intel Pentium 4 or AMD Athlon MP processor or greater
‰
2 GB free disk space or greater
‰
2 GB RAM or greater
Operating systems
‰
Solaris—Sun Solaris 9 or 10 with current patch clusters
‰
Linux—Red Hat Enterprise Linux ES 4
‰
SUSE Linux Standard Server and Enterprise Server, v8
Tech Note:
DocuShare is tested to only support 32-bit systems.
Web servers
DocuShare requires a web servlet or server as part of its functionality. DocuShare can be configured to use
one of the following web servers.
‰
Apache 1.3.31 on Solaris 8 or 9—the web server must be installed and running before installing
DocuShare. A version of Apache is included in a separate directory within the DocuShare
ds500-
bxxx-linux.tar.gz
file or
ds500-bxxx-solaris.tar
file.
Only for DocuShare CPX
Filenames are:
cpx500-bxxx-linux.tar.gz
or
cpx500-bxxx-solaris.tar
.
‰
SunOne/Sun Java System Web Server 6.1—the web server must be installed and running before
installing DocuShare.
‰
Red Hat Enterprise Linux 3—the web server must be installed and running before installing
DocuShare.
‰
SUSE Linux Server v8—the web server must be installed and running before installing DocuShare.
See Appendix B, Web Servers for configuring one of the web servers.
Solaris/Linux Server Installation
Preparing to install DocuShare
DocuShare Installation Guide
3–3
Databases
DocuShare uses a database as part of its functionality. DocuShare can be configured to use PostgreSQL,
SQL Server, and Oracle databases.
‰
PostgreSQL 8.0.3—the database must be installed and functioning. You can create and define the
DocuShare database or if selected, a new Named Instance can be created and defined by the
DocuShare installer. A version of PostgreSQL is included in a separate directory within the DocuShare
ds-linux-4.x.tar.gz
file or
ds-solaris-4.x.tar
file. See Appendix C, Databases for configuring
PostgreSQL for DocuShare.
‰
SQL Server 2000 SP4, 2005—SQL Server must be installed and functioning (database established).
You can create and define the DocuShare database.
Note:
DocuShare Release 5/CPX Release 5 with Records Manager requires SQL Server 2000
DocuShare CPX Release 5 with XDB requires SQL Server 2005
To connect DocuShare to the database, obtain the following information from your database
administrator before installing DocuShare.
•
Database User Name
•
Database User Password
•
Database Port
•
Tablespace Name
•
Database Host Name
See Appendix C, Databases for a typical DocuShare tablespace creation script.
On your SQL server:
•
It is recommended that you set the maximum memory usage to 50% of your server’s physical
RAM if you are using SQL Server on the same system as DocuShare,
•
On the New Database dialog window, set the Collation name to
SQL_Latin1_General_CP1_CI_AS
where:
– CI is case insensitive; CS is case sensitive
– AI is accent insensitive; AS is accent sensitive
‰
Oracle v9i, v10g—the database must be installed and functioning. You can create and define the
Oracle tablespace or if selected, can be created and defined by the DocuShare installer. Oracle 9.2.0
should have the Server Patch Set 9.2.0.6 installed.
Note:
DocuShare Release 5/CPX Release 5 with Records Manager requires Oracle v9i
Caution: If your system will be operating with multibyte characters, ensure that your database
character encoding is set to AL32UTF8. Refer to your Oracle database documentation for
details.
Preparing to install DocuShare
Solaris/Linux Server Installation
3–4
DocuShare Installation Guide
To connect DocuShare to the database, obtain the following information from your database
administrator before installing DocuShare.
•
Database User Name
•
Database User Password
•
Database Port
•
Tablespace Name
•
Database SID
•
Database Host Name
See Oracle database on page C–12 for a typical DocuShare tablespace creation script.
Tech Note:
Oracle v.9i, the CLOB datatype must be
enabled
and the No Sort option
disabled
to work
with DocuShare. Check the DocuShare Knowledge Base at http://www.xerox.com/docushare/
support for details.
‰
DB2 v8.2—the database must be installed and functioning. You can create and define the DB2
tablespace or if selected, can be created and defined by the DocuShare installer.
To connect DocuShare to the database, obtain the following information from your database
administrator before installing DocuShare.
•
Database User Name
•
Database User Password
•
Database Port
•
Regular tablespace Name; System temporary tablespace; Large tablespace name (optional);
Index tablespace name (optional)—all tablespaces must have 32K bufferpools.
•
Database SID
•
Database Host Name
See DB2 on page C–15 for a typical DocuShare tablespace creation script.
LDAP (Lightweight Directory Access Protocol) Servers
‰
SunOne/Sun Java Directory Server 5.2 and S5.1 with SP1
Solaris/Linux Server Installation
Preparing to install DocuShare
DocuShare Installation Guide
3–5
Security
Scanning
The DocuShare installation has a Scan-to-DocuShare via FTP option. An internal FTP server is installed
when the Scan-to-DocuShare via FTP option is selected for installation.
Caution: If your environment prohibits installing an FTP server for security reasons, select the
Typical DocuShare Server install without the FTP scan feature (default).
Secure Sockets Layer (SSL)
SSL provides a secured communication layer between the Apache web server and client web browsers.
SSL functionality is provided by the Apache web server. To achieve SSL connectivity for DocuShare, you
must close the Tomcat servlet port. See Closing the Tomcat servlet port on page 3–18.
OpenOffice v2.0
If you are licensed to use PDF Conversion on DocuShare, you need to download, install, and start
OpenOffice on your server. See PDF Conversion on page 3–21.
Installing DocuShare on a Solaris or Linux server
Solaris/Linux Server Installation
3–6
DocuShare Installation Guide
Installing DocuShare on a Solaris or Linux server
If this is a first time DocuShare install, it is recommended that you read the
DocuShare Installation Guide
before starting the installation. Go to the DocuShare
/doc/install/pdf
directory on the CD-ROM to view or
print the Installation Guide (PDF).
DocuShare download files
If you downloaded the
ds500-bxxx-linux.tar.gz
or
ds500-bxxx-solaris.tar
file into a temporary directory,
you need to extract the DocuShare directory files before launching the installer. Follow the instructions to
unzip or untar the file.
Note:
If installing CPX, the filenames are:
cpx500-bxxx-linux.tar.gz
;
cpx500-bxxx-solaris.tar
. The
DocuShare Release 5/CPX Release 5 installation are similar. The following installation procedure
and screens are for installing DocuShare 5.0.
Linux gz file
1. Unzip the file,
gunzip ds500-bxxx-linux.tar.gz
.
2. Extract the unzipped tar file,
tar -xvf ds500-bxxx-linux.tar
to a temporary directory.
Solaris tar file
If you downloaded
ds500-bxxx-solaris.tar
, extract the tar file,
tar -xvf ds500-bxxx-solaris.tar
to a
temporary directory.
Installing DocuShare
Tech Note:
A database must be installed and functioning, otherwise the DocuShare installation will fail.
See Databases on page 3–3.
1. Log into the server as a UNIX server administrator (root).
Tech Note:
To monitor the DocuShare installation, initial installation activity is recorded in a
DocuShare5InstallLog.txt
file located in the tmp directory. For Solaris, it is
/var/tmp
; for
Linux, it is
/tmp
. When the DocuShare directory is created by the installer, a new
DocuShare5InstallLog.txt
file in the DocuShare home directory continues recording the
remaining installation activities.
Optional for DocuShare installation: to preserve configuration and installation data at the
completion of the DocuShare installation, start the installation in a console window:
./docushare -P docushareLog.cleanUp=false
2. Insert the DocuShare CD-ROM into the server CD-ROM drive. If necessary, mount the cd as root.
Refer to your Linux or Solaris documentation for mounting the CD-ROM drive.
3. To start the DocuShare installation.
a. Double-click
docushare
in the CD-ROM root directory to start the installation.
Solaris/Linux Server Installation
Installing DocuShare on a Solaris or Linux server
DocuShare Installation Guide
3–7
b. If you had downloaded DocuShare from the web and extracted the executable from the gz
(Linux) or tar (Solaris) file, in a console window, cd to
<DSHome>/<Linux><Solaris>/DocuShare
and enter
docushare
to start the executable.
Tech Note:
To install DocuShare remotely or via a console window only, enter the following:
./docushare -console
4. The installation program uses Java to install the product. It takes a few minutes to unpack and
install the Java files.
5. The DocuShare Welcome screen displays at the completion of the Java installation.
6. Click
Next
to start the DocuShare installation. Follow the onscreen instructions.
7. When the DocuShare Installation options window displays, select the option to install DocuShare.
# ./docushare
InstallShield Wizard
Initializing InstallShield Wizard...
Preparing Java(tm) Virtual Machine...
...................................
...................................
Installing DocuShare on a Solaris or Linux server
Solaris/Linux Server Installation
3–8
DocuShare Installation Guide
Caution: The full DocuShare installation has Scan-to-DocuShare capability which utilizes an FTP
server port to receive documents. If your environment prohibits installing an FTP server
for security reasons, select the default to install DocuShare without the FTP scan feature.
8. Click
Next
and follow the onscreen instructions.
9. When the DocuShare Install Parameters window displays, make any changes to the parameters
or click
Next
to accept the default settings. DocuShare requires 9 TCP ports.
•
Tomcat port—designated port for the Tomcat server (default port: 8080)
•
RMI port—designated port for the RMI server (default port: 1090)
•
SunOne Msg port—designated port for the IMQ JMS server port number (default port: 7676)
•
Content store—designated directory location for document repository
•
SMTP Server Name—fully qualified DNS name for the SMTP mail server
•
SMTP Port Number—designated port for the SMTP server (default port: 25)
•
Tomcat Web Bridge Port—designated port for the Tomcat Web Bridge (default port: 8009)
•
Tomcat Server Admin Port—designated port for the Tomcat Web server (default port: 8005)
Solaris/Linux Server Installation
Installing DocuShare on a Solaris or Linux server
DocuShare Installation Guide
3–9
10. The Access configuration window displays. Select the option to set DocuShare access.
•
Guest
—Anyone can enter the DocuShare site (default).
•
User
—Only authenticated registered users can enter the DocuShare site.
•
Administrator
—Only site administrators can enter the DocuShare site.
Click
Next
to continue the installation.
Installing DocuShare on a Solaris or Linux server
Solaris/Linux Server Installation
3–10
DocuShare Installation Guide
11. The Default Date Format window displays. Click to select the default date format:
•
U.S. English—mm/dd/yy
•
International English—dd/mm/yy
Click
Next
to continue the installation.
12. The K2 Search Engine port window displays. Click
Next
.
13. When the Database Configuration screen displays, select the database option for your DocuShare
site and click
Next
.
Solaris/Linux Server Installation
Installing DocuShare on a Solaris or Linux server
DocuShare Installation Guide
3–11
Caution: If you are using an Oracle database set for multibyte characters, ensure that you enter the
Oracle Name Instance that has the character encoding set to AL32UTF8.
14. If you are using PostgreSQL as your DocuShare database, do the following:
a. Enter the Database User and Password.
b. Enter the appropriate database information.
c. Click
Next
to continue.
15. When the Web Server Interaction screen displays, select the web server option for your
DocuShare site. Click
Next
to continue.
16. When the DocuShare Web server parameters window displays
a. Enter the hostname (fully qualified DNS name, such as docushare.domain.com) for your
DocuShare server.
b. Server root (docushare is the default). Refer to Connecting to your DocuShare server on page
3–20
.
c. Select HTTP or HTTPS.
Caution: Select HTTPS only if your web server is configured for HTTPS service; this could
adversely affect DocuShare functionality.
Installing DocuShare on a Solaris or Linux server
Solaris/Linux Server Installation
3–12
DocuShare Installation Guide
d. Click
Next
to continue the installation.
17. When the UNIX Account Parameters window displays, enter the appropriate information.
Tech Note:
The default is
nobody
, which allows any user with an UNIX account to login and start
DocuShare. If Scan-to-DocuShare is installed, you must be root to start DocuShare to enable
the scan feature. To enable the Scan-to-DocuShare feature by non-root users, the FTP server
default port (port 21) must be modified to another port above port 1024 (ftpd.conf) and the
Xerox Work Centres must be able to specify this port.
18. Click
Next
to continue the installation.
19. When the Installer completes the DocuShare installation, click
Finish
to close the Installer.
20. In a console window, cd to
<DSHome>/bin
and enter
./start_docushare.sh
to start DocuShare.
Solaris/Linux Server Installation
Installing DocuShare on a Solaris or Linux server
DocuShare Installation Guide
3–13
Note:
DocuShare initial startup automatically updates the search indexes; allow five minutes before
accessing the site via a browser.
21. If you had elected to use Apache as a web server, go to Appendix B, Web Servers to configure
Apache as the web server.
22. If your DocuShare site is enabled for Scan-to-DocuShare via FTP, you need to disable the UNIX
FTP service on your UNIX system. Go to Disabling the UNIX FTP service on page 3–19.
23. To license your DocuShare server:
a. Log into the DocuShare server as admin using the password you supplied during the installa-
tion.
b. On the navigation bar, click
Admin Home
.
c. From the Administration menu, click
Site Management | License
.
d. Record or copy your server ID.
e. If this installation is for evaluation, click the link or go to:
http://docushare.xerox.com/ds/ds-trial.htm to complete the form and obtain a 30-day license.
See Licensing on page 1–3 to obtain a DocuShare license for your site.
24. Refer to the
DocuShare Administrator Guide
to configure your DocuShare site.
Tech Note:
You can create a boot time file for your system by editing the sample file,
ds4
, which is
available in the DocuShare home/bin directory and placing it in init.d directory.
Upgrading to DocuShare 5
Solaris/Linux Server Installation
3–14
DocuShare Installation Guide
Upgrading to DocuShare 5
If you are upgrading from a previous DocuShare version to DocuShare Release 5/CPX Release 5, the
DocuShare Installer includes an upgrade utility. You can upgrade your server to DocuShare Release 5/
CPX Release 5 using the DocuShare Release 5/CPX Release 5 Installer CD or from the DocuShare
Release 5/CPX Release 5 application downloaded from the web.
Note:
The DocuShare upgrade utility only upgrades DocuShare 5.x. To check your DocuShare version,
click
About DocuShare
on the Home page.
The DocuShare Release 5/CPX Release 5 upgrade are similar. The following installation procedure
and screens are for upgrading to DocuShare 5.0.
To monitor the DocuShare upgrade, installation and upgrade activity is recorded in a
log.txt
file located in
the DocuShare home directory.
To upgrade to DocuShare Release 5/CPX Release 5:
1. Log into your server as a UNIX server administrator (root).
2. Stop the DocuShare server. In a console window, cd to
<DSHome>/bin
and
enter
./dsservice.sh -shutdown
.
3. To ensure the security of your DocuShare site data, backup your database. Refer to the
DocuShare Administrator Guide
or to your database server documentation, for data backup and
restore procedures.
4. In your database server manager, stop the database for DocuShare.
5. Perform a system backup of DocuShare. Refer to the
DocuShare Administrator Guide
for system
backup.
6. Restart the database; the database must be running for the DocuShare Installer to upgrade the
database schema.
7. Insert the DocuShare CD-ROM into the server CD-ROM drive. If necessary, mount the cd as root.
Refer to your Linux or Solaris documentation for mounting the CD-ROM drive.
8. To start the DocuShare upgrade.
a. Double-click
docushare
in the CD-ROM root directory to start the installation.
b. If you had downloaded DocuShare from the web and extracted the executable from the gz
(Linux) or tar (Solaris) file, cd to
<DSHome>/<Linux><Solaris>/DocuShare
and enter
docushare
to start the executable.
See DocuShare download files on page 3–6.
Tech Note:
To install DocuShare remotely or via a console window only, enter the following:
./docushare -console
9. Click
Install DocuShare
on the DocuShare Install Menu to begin the installation.
The installation program uses Java to install the product. It takes a few minutes to unpack and
install the Java files. Click
Next
to start the DocuShare installation and follow the onscreen
instructions.
Solaris/Linux Server Installation
Upgrading to DocuShare 5
DocuShare Installation Guide
3–15
Tech Note:
Optional for DocuShare installation: to preserve configuration and installation data at the
completion of the DocuShare installation, start the installation in a console window:
./docushare -P docushareLog.cleanUp=false
10. When the DocuShare Installation options window displays, select the option to install DocuShare.
Caution: The full DocuShare installation has Scan-to-DocuShare capability which utilizes an FTP
server port to receive documents. If your environment prohibits installing an FTP server
for security reasons, select the default to install DocuShare without the FTP scan feature.
11. Click
Next
and follow the onscreen instructions.
Tech Note:
Whether the installer locates an installed DocuShare instance or that you provide an installed
DocuShare path, the installer determines the version installed and provides either the option
to upgrade or reinstall.
12. When the Upgrade Option window displays, click
Upgrade
.
13. Follow the onscreen instructions to continue the upgrade. During the upgrade process, the
DocuShare upgrade utility backs up the appropriate system server configuration and data.
14. When the installer completes the DocuShare upgrade, click
Finish
to close the installer.
15. In a console window, cd to
<DSHome>/bin/
and enter
./start_docushare.sh
to start DocuShare.
Note:
If you are upgrading from DocuShare 4.0.x, DocuShare installer displays a DirectoryException
message and restarts DocuShare. If upgrading from DocuShare 4.1, the message does not display
and a restart does not occur.
Upgrading to DocuShare 5
Solaris/Linux Server Installation
3–16
DocuShare Installation Guide
16. Perform the database optimization task. Refer to database maintenance in the
DocuShare
Administrator Guide
for database optimization procedures. When optimization is completed,
continue to the next step.
17. Run
dsindex index_all
from the DocuShare 5 server bin directory.
Tech Note:
Customized Release 4.x or older VDF versions are not convertible to DocuShare Release 5/
CPX Release 5. Contact DocuShare Customer Support at 1-800-835-9013 or visit http://
docushare.xerox.com/ds/support_sub.html for technical assistance.
Solaris/Linux Server Installation
Uninstalling DocuShare
DocuShare Installation Guide
3–17
Uninstalling DocuShare
To uninstall DocuShare Release 5/CPX Release 5 from your Solaris/Linux server, run the uninstall script,
doc_uninstaller. Uninstall will remove the DocuShare directory and its contents. You can do the following
before uninstalling DocuShare.
•
Leave the repository in its current location.
•
Save your repository content to another storage media by using the DocuShare command line
utility,
dsexport
, prior to uninstalling DocuShare. Refer to the
DocuShare Command Line Utilities
Guide
for details.
To uninstall DocuShare:
1. Log into the server as a UNIX server administrator (root).
2. Stop the DocuShare server. In a console window, change directory to
<DSHome>/bin
and enter
./stop_docushare.sh
.
3. Change directory to
<DSHome>/_uninst
.
4. Enter
./doc_uninstall
. Follow the onscreen instructions.
5. Remove the directory in which DocuShare was installed.
Note:
Uninstall removes all installed languages, such as French, German, and Spanish.
Closing the Tomcat servlet port
Solaris/Linux Server Installation
3–18
DocuShare Installation Guide
Closing the Tomcat servlet port
During the DocuShare 5 installation, if you selected to install the Apache option on the Web Server
Interaction page, you can configure your DocuShare server for SSL by closing the Tomcat web servlet port
to web browser access.
Tech Note:
For details configuring SSL on:
• Apache, go to http://httpd.apache.org/docs-2.0/ssl/ssl_howto.html.
• Sun Java, go to http://docs.jcu.edu.au/sws6.1/manual/https/ag/agcert.html.
To close the Tomcat servlet port:
1. Log into the server as a UNIX server administrator (root).
2. In a console window, check the Tomcat servlet port status using the command,
./dsservice.sh status
in the directory ../Xerox/Docushare/bin.
3. Stop DocuShare by entering the command,
./stop_docushare.sh
.
Resources:
For a complete list of start_docushare commands and arguments, enter
./start_docushare.sh help
in the console window.
4. Enter the command,
./start_docushare.sh tomcat http off
, to close the Tomcat web servlet http
port. This action closes the port providing access to the Tomcat web servlet via a web browser.
5. Enter the command,
./start_docushare.sh tomcat http on
, to open the port to the Tomcat web
servlet. This action allows access to the Tomcat web servlet.
Note:
To update only the environment, add the argument
update-only
to the end of the start_docushare
command.
Solaris/Linux Server Installation
Disabling the UNIX FTP service
DocuShare Installation Guide
3–19
Disabling the UNIX FTP service
The typical DocuShare installation has Scan-to-DocuShare capability which utilizes its own FTP server to
receive documents. The FTP service on the UNIX systems must be disabled to allow DocuShare to
receive scanned documents through its own FTP server port.
To disable the FTP service on Linux:
1. Log into the server as a UNIX server administrator (root).
2. From the Start menu, select
Service Configuration
.
3. In the Service Configuration window, de-select
wu-ftpd
.
To disable the FTP service on Solaris:
1. Log into the server as a UNIX server administrator (root).
2. Edit
/etc/inetd.conf
file by commenting out the line for FTPD daemon.
3. Enter
ps -ef | grep inetd
to obtain your system PID.
4. Restart
inetd
.
5. Enter the command,
Kill -HUP PID
(PID obtained in step 3).
Tech Note:
If Scan-via-FTP is installed, you must be root to start DocuShare to enable the scan feature.
To enable the Scan-via-FTP feature by non-root users, the FTP server default port (port 21)
must be modified to another port above port 1024 (ftpd.conf) and the Xerox Work Centres
must be able to specify this port.
Connecting to your DocuShare server
Solaris/Linux Server Installation
3–20
DocuShare Installation Guide
Connecting to your DocuShare server
At the completion of the DocuShare installation, try connecting to your new DocuShare server using a web
browser. The default URL is http://<fully qualified DNS name>:8080/docushare.
a. If DocuShare was installed to the home directory on your web site, the URL is:
http://<fully qualified DNS name>:<port>/
b. If DocuShare was installed into a subdirectory on your web site, the URL is:
http://<fully qualified DNS name>:<port>/<subdirectory_path>/
•
If you specified to install Apache on your server, then the :<port> component of the URL is not
used. For example: http://<fully qualified DNS name>/docushare
•
If you specified to install only Tomcat on your server, then the :<port> component of the URL is
8080 (default).
If the installation was successful, you should be viewing the default home page of your new DocuShare
server. The home page has links to many useful features and to several pre-installed collections.
DocuShare login
You can log in as
admin
at this time, using the password you created during the installation. You need to
license the server to enable creating collections and adding documents to your server.
Account Creation Authority
is the default allowing all users to access the site and create their own user
accounts. Site access can be configured for limited or restricted access. Refer to the Account
Management/Access Policies section in the
DocuShare Administrator Guide
.
Resources:
Take a moment to scan the
DocuShare User
and
Administrator Tutorials
that are included on
the DocuShare Help page to familiarize yourself with DocuShare features and administration.
Solaris/Linux Server Installation
PDF Conversion
DocuShare Installation Guide
3–21
PDF Conversion
If you are licensed to use PDF Conversion on DocuShare, you need to download and install OpenOffice on
your server and set the environment to access an X Server to display vector graphics.
To install OpenOffice:
1. Go to the OpenOffice website at http://www.openoffice.org.
2. Download OpenOffice v2.0 (or higher) to a temporary directory.
3. Follow the installation instructions to:
a. install OpenOffice.
b. start OpenOffice.
Note:
OpenOffice must be started and that the License Agreement is accepted before running
DocuShare.
4. Note the pathname where OpenOffice is installed.
5. In a console window prompt, set the environment to display vector graphics. Enter:
setenv DISPLAY serverhostname:0.0
or
setenv DISPLAY ipaddress:0.0
6. Refer to the
DocuShare Administrator Guide
to enable DocuShare PDF conversion from the
DocuShare Administrator UI.
7. Restart DocuShare. This concludes the OpenOffice installation.
PDF Conversion
Solaris/Linux Server Installation
3–22
DocuShare Installation Guide
DocuShare Installation Guide
A–1
DocuShare Applications
This appendix provides installation instructions for DocuShare applications.
•
DocuShare Windows Client . . . . . . . . . . . . . . . . . . . . . . . . . . . . . . . . . . . . . . . . . . . . . . . . . . . . A–2
•
DocuShare Outlook Client. . . . . . . . . . . . . . . . . . . . . . . . . . . . . . . . . . . . . . . . . . . . . . . . . . . . . . A–4
•
PaperPort Link to DocuShare . . . . . . . . . . . . . . . . . . . . . . . . . . . . . . . . . . . . . . . . . . . . . . . . . . . A–6
DocuShare Windows Client
DocuShare Applications
A–2
DocuShare Installation Guide
DocuShare Windows Client
DocuShare Windows Client enables you to conveniently access your DocuShare collections from
Microsoft Windows Explorer. From a single desktop location, you can browse collections, edit and save
files, drag and drop files to collections, and search for content.
To download and install the software, follow the steps below. After installing DocuShare Windows Client,
get started using its features by selecting DocuShare Help Topics from Explorer's Help menu.
System requirements
•
Microsoft Windows 2000 Professional with Service Pack 4, Microsoft Windows XP Professional
with Service Pack 2
•
Microsoft Office Professional 2000, XP, or 2003
•
Microsoft Internet Explorer version 5.5 or higher
•
TCP/IP network connection to a DocuShare server running version 3.0 or higher
•
64 MB RAM or greater
•
30 MB free disk space for program files
•
100 MB or greater free disk space on the installation drive for work-in-progress files
Note:
Installation of the application may fail if you do not have adequate administrative privileges on your
computer. If you receive error messages that warn of locked or in-use resources, you may need to
have an administrator install the software.
To install DocuShare Windows Client:
1. On the DocuShare navigation bar, click the
Help
link. The Help Desk displays.
2. Click the
Downloads
tab. A list of DocuShare applications displays.
3. Click the
DocuShare Windows Client
.
DocuShare Applications
DocuShare Windows Client
DocuShare Installation Guide
A–3
4. Download the installation file to a temporary location on your computer.
5. Locate the installation file using your file management tool. Double-click the file to start the
installation program. Follow the on-screen instructions.
6. When the installation is complete, you can delete the installation program.
7. Open the DocuShare Client icon. Double-click
Map Server
to add a server to your DocuShare
folder.
Resources:
Refer to the ReadMe file included with this release for any additional instructions or notes.
DocuShare Outlook Client
DocuShare Applications
A–4
DocuShare Installation Guide
DocuShare Outlook Client
DocuShare Outlook Client enables you to conveniently access your DocuShare collections within
Microsoft Outlook. From a single desktop location, you can browse collections, edit and save files, drag
and drop messages and attachments to collections, and search for content.
To download and install the software, follow the steps below. After installing DocuShare Outlook Client, get
started using its features by selecting DocuShare Outlook Client Help from Outlook's Help menu.
System requirements
•
Microsoft Windows 2000 Professional with Service Pack 4, Microsoft Windows XP Professional
with Service Pack 2
•
Microsoft Office Professional 2000, XP, or 2003
•
Microsoft Outook 2000, 2002, XP, or 2003
•
Microsoft Internet Explorer version 5.5 or higher
•
DocuShare Windows Client 4.0 or higher
•
TCP/IP network connection to a DocuShare server running version 3.0 or higher
•
64 MB RAM or greater
•
30 MB free disk space for program files
•
100 MB or greater free disk space on the installation drive for work-in-progress files
Note:
Installation of the application may fail if you do not have adequate administrative privileges on your
computer. If you receive error messages that warn of locked or in-use resources, you may need to
have an administrator install the software.
To install DocuShare Outlook Client:
1. On the DocuShare navigation bar, click the
Help
link. The Help Desk displays.
2. Click the
Downloads
tab. A list of DocuShare applications displays.
DocuShare Applications
DocuShare Outlook Client
DocuShare Installation Guide
A–5
3. Click the
DocuShare Outlook Client
.
4. Download the installation file to a temporary location on your computer.
5. Locate the installation file using your file management tool. Double-click the file to start the
installation program. Follow the on-screen instructions.
6. When the installation is complete, you can delete the installation program.
7. Open Outlook and follow the Setup wizard to map your DocuShare server and enter your mail
account information.
Resources:
Refer to the ReadMe file included with this release for any additional instructions or notes.
PaperPort Link to DocuShare
DocuShare Applications
A–6
DocuShare Installation Guide
PaperPort Link to DocuShare
PaperPort Link to DocuShare is a program link for the popular ScanSoft PaperPort application that is
included with many desktop scanners. The link enables you to send items to DocuShare from the
PaperPort desktop.
To download and install the software, follow the steps below. After installing the PaperPort Link to
DocuShare, online help is available by clicking the Link Help button in the Send To Options window.
PaperPort versions
DocuShare Release 5/CPX Release 5 supports:
•
PaperPort Professional 9, 10
•
PaperPort Deluxe 8, 9
•
PaperPort 10.
System requirements
•
Microsoft Windows 2000 Professional with Service Pack 4, Microsoft Windows XP Professional
with Service Pack 2
•
Microsoft Internet Explorer version 5.5 or higher
•
TCP/IP network connection to a DocuShare server running version 2.0 or higher
•
64 MB RAM
•
30 MB free disk space for program files
Note:
Installation of the application may fail if you do not have adequate administrative privileges on your
computer. If you receive error messages that warn of locked or in-use resources, you may need to
have an administrator install the software. Additionally, it is recommended that you install
DocuShare Windows Client (DocuShare Windows Client on page A–2) before installing the
PaperPort Link to DocuShare.
To install PaperPort Link to DocuShare:
1. On the DocuShare navigation bar, click the
Help
link. The Help Desk displays.
2. Click the
Downloads
tab. A list of DocuShare applications displays.
DocuShare Applications
PaperPort Link to DocuShare
DocuShare Installation Guide
A–7
3. Click the
PaperPort Link to DocuShare
.
4. Download the installation file to a temporary location on your computer.
5. Locate the installation file using your file management tool. Double-click the file to start the
installation program. Follow the on-screen instructions.
6. When the installation is complete, you can delete the installation program.
7. Open the PaperPort application. The DocuShare icon appears on the Send To bar.
Resources:
Refer to the ReadMe file included with this release for any additional instructions or notes.
PaperPort Link to DocuShare
DocuShare Applications
A–8
DocuShare Installation Guide
DocuShare Installation Guide
B–1
Web Servers
This appendix provides configuration instructions for Apache or Sun Java web servers to work with the
DocuShare Release 5/CPX Release 5 Tomcat servlet engine:
•
Installing Apache for DocuShare on Linux . . . . . . . . . . . . . . . . . . . . . . . . . . . . . . . . . . . . . . . . . B–4
•
Installing Apache for DocuShare on Solaris . . . . . . . . . . . . . . . . . . . . . . . . . . . . . . . . . . . . . . . . B–7
•
Installing Apache for DocuShare on Windows . . . . . . . . . . . . . . . . . . . . . . . . . . . . . . . . . . . . . . B–9
•
Sun Java Web Server . . . . . . . . . . . . . . . . . . . . . . . . . . . . . . . . . . . . . . . . . . . . . . . . . . . . . . . . B–11
•
IIS Web server . . . . . . . . . . . . . . . . . . . . . . . . . . . . . . . . . . . . . . . . . . . . . . . . . . . . . . . . . . . . . B–16
Apache web server
B–2
DocuShare Installation Guide
Apache web server
DocuShare Release 5/CPX Release 5 has been tested with Apache HTTP server version, 1.3.31 and
2.0.50. These are the current Apache web servers from www.apache.org.
Included on the DocuShare Release 5/CPX Release 5 product CD, are the source distribution for Apache
1.3.31 and Apache 2.0.50 for Solaris and Linux. These are the Apache web server versions used during
development of DocuShare Release 5/CPX Release 5. Included on the DocuShare Release 5/CPX
Release 5 product CD, are compiled versions for each platform. The Apache web servers were compiled
on both Red Hat Enterprise Linux ES and SuSE 8.0 Standard servers. If you are using Windows, it is
recommended to use the compiled version.
Note:
Information and Apache files are located in the following directory:
drive:\docushare\platform\<operating system>
Compiling Apache 1.3.31
The requirements for this Apache installation is a C++ compiler and GNU make. To compile the source use
the following commands:
> su
> mkdir <apache_build_area>
> cp <cd location> .
> gunzip apache_1.3.31.tar.gz
> tar xvf apache_1.3.31.tar
> cd apache_1.3.31
> ./configure --prefix=PREFIX --enable-module=all --disable-module=auth_db
> make
> make install
> PREFIX/bin/apachectl start
PREFIX is the location where you would like Apache installed. There are installation instructions at
<apache_build_area>/apache_1.3.31/INSTALL that can assist you if the defaults are not sufficient.
Compiling Apache 2.0.50
The requirements of the Apache installation is a C++ compiler and GNU make. To compile the source use
the following commands:
> su
> mkdir <apache_build_area>
> cp <cd location> .
> gunzip httpd-2.0.50.tar.gz
> tar xvf httpd-2.0.50.tar
> cd httpd-2.0.50
> ./configure --prefix=PREFIX --enable-module=all
> make
Apache web server
DocuShare Installation Guide
B–3
> make install
> PREFIX/bin/apachectl start
PREFIX is the location where you would like Apache installed. There are installation instructions at
<apache_build_area>/httpd-2.0.50/INSTALL that will assist you if the defaults are not sufficient.
Installing Apache for DocuShare on Linux
B–4
DocuShare Installation Guide
Installing Apache for DocuShare on Linux
DocuShare Release 5/CPX Release 5 has been tested with Apache HTTP server version, 1.3.31 and
2.0.50. These are the current Apache web servers from www.apache.org. These Apache web servers
were compiled on both Red Hat Enterprise Linux ES and SuSE 8.0 Standard servers.
Installing Apache 1.3.31
The Apache web server was compiled with the install directory /
usr/local/apache/1.3.31
. If this location is
not suitable for your installation then you have to compile the Apache source with your desired target
directory.
To install version 1.3.31, use the following commands. Substitute <platform>, with
rhel3
for RedHat
Enterprise Linux ES and
suse
for SuSE 8.0 Standard Server.
> su
> cd /usr/local
> mkdir apache
> cd apache
> cp <cd location>
> gunzip apache-1.3.31-bin-<platform>.tar.gz
> tar xvf apache-1.3.31-bin-<platform>.tar
> /usr/local/apache/1.3.31/bin/apachectl start
Installing Apache 2.0.50
The Apache web server was compiled with the install directory of
/usr/local/apache/2.0.50
. If this location
is not suitable for your installation then you have to compile the Apache source with your desired target
directory.
To install version 2.0.50, use the following commands. Substitute <platform> with
rhel3
for Red Hat
Enterprise Linux ES and
suse
for SuSE 8.0 Standard Server.
> su
> cd /usr/local
> mkdir apache
> cd apache
> cp <cd location>
> gunzip apache-2.0.50-bin-<platform>.tar.gz
> tar xvf apache-2.0.50-bin-<platform>.tar
> /usr/local/apache/2.0.50/bin/apachectl start
Configuring the Apache connection
Apache was compiled along with the Tomcat connector to interact with DocuShare Release 5/CPX
Release 5. The following procedure provides configuration instructions for the DocuShare 5/CPX-Tomcat
servlet engine. The Tomcat-Apache bridge uses the mod_jk module that loads into Apache as Apache
starts and uses the auto-generated configuration file from Tomcat to define the Apache module.
Installing Apache for DocuShare on Linux
DocuShare Installation Guide
B–5
The Apache directories contains the following:
•
/lib
– mod_jk.so
•
/tomcat-conf
–
httpd.conf
—an example httpd configuration file with Tomcat bridge additions
–
mod_jk-howto.html
—the documentation from apache.org on how to configure Apache and
Tomcat
–
server.xml
—an example of the Tomcat server configuration file with the auto configuration
lines added
–
jk
—the directory to add the bridge configuration for Tomcat
–
jk/worker.properties
—an example of the Apache-Tomcat bridge configuration
Use the following procedure to configure the DocuShare-Apache connection. If you installed version
2.0.50, replace apache1.3 with
apache2.0
.
The DocuShare install wizard creates a file that contains the values that point to the DocuShare
installation. This file is located at
<DocuShare Installation Directory>/tomcat/conf/jk/apache1.3/httpd.conf
1. Add the lines contained in this file to your
httpd.conf
file for your Apache installation. A typical
location for this file on Linux is
/etc/httpd/conf/httpd.conf
. You will need to edit the correct config
file for your version of Apache.
Tech Note:
If you are running Apache 2.0, replace Directory with
Location
after adding the lines to your
httpd.conf
file; the lines should be:
<Location “/docushare/”>
AuthType Basic
AuthName “DocuShare”
AuthUserFile /etc/httpd/htpasswd
Require valid-user
</Location>
2. Copy the bridge library to the Apache directory. If your Apache installation contains a
<ApacheHome>/modules directory and not a <ApacheHome>/libexec directory, you can create
the libexec directory by linking with the modules directory.
a.
Cd <ApacheHome>
b. Enter
In -s modules libexec
c. Perform the bridge library copy
<DocuShareHome>/tomcat/bin/native/apache1.3/mod_jk.so <ApacheHome>/libexec
Substitute mod_jk.so with
mod_rhel3
for Red Hat and
mod_suse.so
for SuSE.
Installing Apache for DocuShare on Linux
B–6
DocuShare Installation Guide
3. Restart Apache.
apachectl stop
apachectl start
This completes the Apache configuration. Now you can connect to DocuShare Release 5/CPX Release 5
through a browser of your choice at the location
http://<host>/docushare/dsweb/index.html
.
Installing Apache for DocuShare on Solaris
DocuShare Installation Guide
B–7
Installing Apache for DocuShare on Solaris
DocuShare Release 5/CPX Release 5 has been tested with Apache HTTP server version, 1.3.31 and
2.0.50. These are the current Apache web servers from www.apache.org. These Apache versions were
tested with Solaris 8 and 9.
Installing Apache 1.3.31
The Apache web server was compiled with the install directory /
usr/local/apache/1.3.31
. If this location is
not suitable for your installation then you have to compile the Apache source with your desired target
directory.
To install version 1.3.31:
> su
> cd /usr/local
> mkdir apache
> cd apache
> cp <cd location>
> gunzip apache-1.3.31-bin-solaris.tar.gz
> tar xvf apache-1.3.31-bin-solaris.tar
> /usr/local/apache/1.3.31/bin/apachectl start
Installing Apache 2.0.50
The Apache web server was compiled with the install directory of
/usr/local/apache/2.0.50
. If this location
is not suitable for your installation then you have to compile the Apache source with your desired target
directory.
To install version 2.0.50:
> su
> cd /usr/local
> mkdir apache
> cd apache
> cp <cd location>
> gunzip apache-2.0.50-bin-solaris.tar.gz
> tar xvf apache-2.0.50-bin-solaris.tar
> /usr/local/apache/2.0.50/bin/apachectl start
Configuring the Apache connection
Apache was compiled along with the Tomcat connector to interact with DocuShare Release 5/CPX
Release 5. The following procedure provides configuration instructions for the DocuShare 5/CPX-Tomcat
servlet engine and Apache. The Tomcat-Apache bridge uses the mod_jk module that loads into Apache as
Apache starts and uses the auto-generated configuration file from Tomcat to define the Apache module.
The Apache directories contains the following:
Installing Apache for DocuShare on Solaris
B–8
DocuShare Installation Guide
•
/lib
– mod_jk.so
•
/tomcat-conf
–
httpd.conf
—an example httpd configuration file with Tomcat bridge additions
–
mod_jk-howto.html
—the documentation from apache.org on how to configure Apache and
Tomcat
–
server.xml
—an example of the Tomcat server configuration file with the auto configuration
lines added
–
jk
—the directory to add the bridge configuration for Tomcat
–
jk/worker.properties
—an example of the Apache-Tomcat bridge configuration
Use the following procedure to configure the DocuShare-Apache connection.
The DocuShare install wizard creates a file that contains the values that point to the DocuShare
installation. This file is located at
<DocuShare Installation Directory>/tomcat/conf/jk/apache1.3/httpd.conf
Use the following procedure to configure the DocuShare-Apache connection. If you installed version
2.0.50, replace apache1.3 with
apache2.0
.
1. Add the lines contained in this file to your
httpd.conf
file for your Apache installation. A typical
location for this file on Solaris is
/etc/httpd/conf/httpd.conf
. You will need to edit the correct
config file for your version of Apache.
Tech Note:
If you are running Apache 2.0, replace Directory with
Location
after adding the lines to your
httpd.conf
file; the lines should be:
<Location “/docushare/”>
AuthType Basic
AuthName “DocuShare”
AuthUserFile /etc/httpd/htpasswd
Require valid-user
</Location>
2. Copy the bridge library to the Apache directory. If your Apache installation contains a
<ApacheHome>/modules directory and not a <ApacheHome>/libexec directory, you can create
the libexec directory by linking with the modules directory.
a.
Cd <ApacheHome>
b. Enter
In -s modules libexec
c. Perform the bridge library copy
<DocuShareHome>/tomcat/bin/native/apache1.3/mod_jk.so <ApacheHome>/libexec
.
3. Restart Apache.
apachectl stop
apachectl start
This completes the Apache version 1.3.31 configuration. Now you can connect to DocuShare Release 5/
CPX Release 5 through a browser of your choice at the location
http://<host>/docushare/dsweb/
index.html
.
Installing Apache for DocuShare on Windows
DocuShare Installation Guide
B–9
Installing Apache for DocuShare on Windows
DocuShare Release 5/CPX Release 5 has been tested with Apache HTTP server version, 1.3.31 and
2.0.50. These are the current Apache web servers from www.apache.org.
Installing Apache 1.3.31
The file,
apache_1.3.31-win32-x86-no_src.exe
, installs the Apache web server 1.3.31 directly from the
Apache web site. Start the install and follow the onscreen instructions to install the Apache web server on
your system.
Installing Apache 2.0.50
There are two Apache installation options for version 2.0.50:
•
Installing Apache without SSL, but allows you to install to a specific directory.
•
Installing a compiled version of Apache with SSL.
The file
apache_2.0.50-win32-x86-no_ssl.msi
installs the Apache web server 2.0.50 directly from the
Apache web site. This version of Apache does not include SSL but allows you to install to a specified
directory.
The DocuShare team compiled Apache web server 2.0.50 with SSL included that will run from the
installation directory,
C:\apache2
. If you want to use this version from the Apache web site, start the install
and follow the onscreen instructions.
If you want to install the version compiled by the DocuShare team, use the following instructions. This
compiled version was configured to use port 82. If you want to use a different port, edit the
C:\apache2\conf\httpd.conf
file.
To install Apache 2.0.50:
1. Unzip the file
apache-2.0.50-bin-win32.zip
into C:\.
2. Cd to
C:\apache2\bin
.
3. Enter,
apache -k install
to install Apache.
4. Enter
apache -k start
to start Apache.
Configuring the Apache connection
Apache was compiled along with the Tomcat connector to interact with DocuShare Release 5/CPX
Release 5. The following procedure provides configuration instructions for the DocuShare Release 5/CPX
Release 5 Tomcat servlet engine and Apache. The Tomcat-Apache bridge uses the mod_jk module that
loads into Apache as Apache starts and uses the auto-generated configuration file from Tomcat to define
the Apache module. Added to the standard Apache install is the tomcat-config directory. This directory
includes the following files:
•
httpd.conf
—an example httpd configuration file with Tomcat bridge additions
•
mod_jk-howto.html
—documentation from apache.org to configure Apache and Tomcat
•
server.xml
—an example of the Tomcat server configuration file with auto configuration lines
added
•
jk
—the directory to add the bridge configuration for Tomcat
Installing Apache for DocuShare on Windows
B–10
DocuShare Installation Guide
•
jk\worker.properties
—an example of the Apache-Tomcat bridge configuration
To configure the bridge with the preconfigured file:
The DocuShare install wizard creates a file that contains the values that point to the DocuShare
installation. This file is located at
<DocuShare Installation Directory>\tomcat\conf\jk\apache2.0\httpd.conf
.
1. Add the lines contained in this file to your
httpd.conf
file for your Apache installation. A typical
location for this file is
<ApacheHome>\conf\httpd.conf
. You will need to edit the correct config file
for your version of Apache.
Tech Note:
If you are running Apache 2.0, replace Directory with
Location
after adding the lines to your
httpd.conf
file; replace <
Apache2Home
> with your appropriate location; the lines should be:
<Location “\docushare\”>
AuthType Basic
AuthName “DocuShare”
AuthUserFile c:<Apache2Home>\conf\htpasswd
</Location>
2. Copy the bridge library to the Apache directory:
<DocuShareHome>\tomcat\bin\native\apache2.0\mod_jk.dll <ApacheHome>\modules
.
3. Restart Apache.
apache.exe -k stop
apache.exe -k start
This completes the Apache configuration for Windows. Now you can connect to DocuShare Release 5/
CPX Release 5 through a browser of your choice.
Sun Java Web Server
DocuShare Installation Guide
B–11
Sun Java Web Server
This section provides configuration instructions for the Tomcat connector to the Sun Java System 6.1 web
server (previously known as Sun ONE). In this section, the web server will simply be referred to as the Sun
Java web server. DocuShare Release 5/CPX Release 5 has been tested with the Tomcat connector to the
Sun Java web server, version 6.1.
DocuShare Release 5/CPX Release 5 and the Sun Java web server 6.1 has been tested with the following
operating systems:
•
Windows 2000, 2003
•
Red Hat Linux Enterprise AS and ES versions 2.1 and 3
•
SUSE LINUX v8
•
Solaris 8 and 9
Configuring the Sun Java web server
There are two options to configuring the Sun Java web server for each platform:
•
Using the preconfigured file.
•
Using the connection kit.
Configuring Sun Java for DocuShare on Windows
The following procedure provides the configuration of the Tomcat servlet engine in DocuShare Release 5/
CPX Release 5. The Tomcat/Sun Java bridge uses the mod_jk module that loads into Sun Java as the web
server starts.
There are two main directories and associated files in this connection kit:
•
/lib
–
nsapi_redirect.dll
—the tomcat ajp13 redirector library
•
/conf
–
worker.properties
—an example of the Tomcat/Sun Java bridge configuration
–
obj.conf.orig
—a clean Sun Java web server configuration file from a fresh install
–
obj.conf—
an example of a Sun Java web server configuration file after updates to activate the
Tomcat/Sun Java bridge
Configuring the web server
The DocuShare install wizard creates a file that contains the values that point to the DocuShare
installation. This file is located at
<DocuShare Installation Directory>\tomcat\conf\jk\netscape\obj.conf
.
1. Adding the bridge library location.
Add the lines within this file for your Sun Java installation. Depending on the version of web server,
these lines go into the
Init
section of either the
obj.conf
file or the
magnus.conf
file for the web
server.
Sun Java Web Server
B–12
DocuShare Installation Guide
Note:
Sun Java version 6.1 has both an
obj.conf
and
magnus.conf
files.
Replace
/usr/local/Xerox/Docushare
with the directory location where DocuShare is installed or
use the preconfigured lines from
<DocuShareInstallationDirectory>\tomcat\conf\jk\netscape\obj.conf
.
Tech Note:
Use forward slashes; backward slashes can cause problems. If you want to minimize the log
file size, substitute
emerg
for
debug
. Only critical Tomcat/Sun Java activities are logged.
Init fn="load-modules" funcs="jk_init,jk_service" shlib="C:/usr/local/Xerox/
Docushare/ds3-netscape-solaris/lib/nsapi_redirect.dll"
Init fn="jk_init" worker_file="C:/usr/local/Xerox/Docushare/ds3-netscape-
solaris/config/workers.properties" log_level="debug"
log_file="C:/usr/local/Xerox/Docushare/ds3-netscape-solaris/config/
nsapi.log"
2. Adding the name mapping.
Add the following lines to the beginning of the
NameTrans
section of the
obj.conf
file.
NameTrans fn="assign-name" from="/servlet/*" name="tcservlet"
NameTrans fn="assign-name" from="/examples/*" name="tcservlet"
NameTrans fn="assign-name" from="/docushare" name="tcservlet"
NameTrans fn="assign-name" from="/docushare/*" name="tcservlet"
3. Adding the service mapping.
Add the following lines to the end of the
obj.conf
file.
<Object name="tcservlet">
ObjectType fn=force-type type=text/plain
Service fn="jk_service" worker="ajp13"
</Object>
4. Restart the web server.
a. Stop the web server with the admin console.
b. Load the new configuration with the admin console.
c. Start the web server with the admin console.
This completes the Windows Tomcat/Sun Java configuration. Connect to DocuShare Release 5/CPX
Release 5 through a browser of your choice at the location
http://<host>/docushare/
.
Configuring Sun Java for DocuShare on Linux
The following procedure provides the configuration of the Tomcat servlet engine within DocuShare
Release 5/CPX Release 5. The Tomcat/Sun Java bridge uses the mod_jk module that loads into Sun Java
as the web server starts.
There are two main directories and associated files in this connection kit:
•
/lib
Sun Java Web Server
DocuShare Installation Guide
B–13
–
nsapi_redirector.so
—the tomcat ajp13 redirector library
•
/conf
–
worker.properties
—an example of the Tomcat/Sun Java bridge configuration
–
obj.conf.orig
—a clean Sun Java web server configuration file from a fresh install
–
obj.conf—
an example of a Sun Java web server configuration file after updates to activate the
Tomcat/Sun Java bridge
Configuring the web server
The DocuShare install wizard creates a file that contains the values that point to the DocuShare
installation. This file is located at
<DocuShare Installation Directory>/tomcat/conf/jk/netscape/obj.conf
.
1. Adding the bridge library location.
Add the lines within this file for your Sun Java installation. Depending on the version of web server,
these lines go into the
Init
section of either the
obj.conf
file or the
magnus.conf
file for the web
server.
Tech Note:
Sun Java version 6.1 has both an
obj.conf
and
magnus.conf
files.
Replace
/usr/local/Xerox/Docushare
with the directory location where DocuShare is installed or
use the preconfigured lines from
<DocuShareInstallationDirectory>/tomcat/conf/jk/netscape/obj.conf
.
If you want to minimize the log file size, substitute
emerg
for
debug
. Only critical Tomcat/Sun Java
activities are logged.
Init fn="load-modules" funcs="jk_init,jk_service" shlib="/usr/local/Xerox/
Docushare/ds3-netscape-solaris/lib/nsapi_redirector.so"
Init fn="jk_init" worker_file="/usr/local/Xerox/Docushare/ds3-netscape-
solaris/config/workers.properties" log_level="debug"
log_file="/usr/local/Xerox/Docushare/ds3-netscape-solaris/config/nsapi.log"
2. Adding the name mapping.
Add the following lines to the beginning of the
NameTrans
section of the
obj.conf
file.
NameTrans fn="assign-name" from="/servlet/*" name="tcservlet"
NameTrans fn="assign-name" from="/examples/*" name="tcservlet"
NameTrans fn="assign-name" from="/docushare" name="tcservlet"
NameTrans fn="assign-name" from="/docushare/*" name="tcservlet"
3. Adding the service mapping.
Add the following lines to the end of the
obj.conf
file.
<Object name="tcservlet">
ObjectType fn=force-type type=text/plain
Service fn="jk_service" worker="ajp13"
</Object>
Sun Java Web Server
B–14
DocuShare Installation Guide
4. Restart the web server.
a. Stop the web server with the admin console.
b. Load the new configuration with the admin console.
c. Start the web server with the admin console.
This completes the Linux Tomcat/Sun Java configuration. Connect to DocuShare Release 5/CPX Release
5 through a browser of your choice at the location
http://<host>/docushare/
.
Configuring Sun Java for DocuShare on Solaris
The following procedure provides the configuration of the Tomcat servlet engine within DocuShare
Release 5/CPX Release 5. The Tomcat/Sun Java bridge uses the mod_jk module that loads into Sun Java
as the web server starts.
There are two main directories and associated files in this connection kit:
•
/lib
–
nsapi_redirector.so
—the tomcat ajp13 redirector library
•
/conf
–
worker.properties
—an example of the Tomcat/Sun Java bridge configuration
–
obj.conf.orig
—a clean Sun Java web server configuration file from a fresh install
–
obj.conf—
an example of a Sun Java web server configuration file after updates to activate the
Tomcat/Sun Java bridge
Configuring the web server
The DocuShare install wizard creates a file that contains the values that point to the DocuShare
installation. This file is located at
<DocuShare Installation Directory>/tomcat/conf/jk/netscape/obj.conf
.
1. Adding the bridge library location.
Add the lines within this file for your Sun Java installation. Depending on the version of web server,
these lines go into the
Init
section of either the
obj.conf
file or the
magnus.conf
file for the web
server.
Tech Note:
Sun Java version 6.1 has both an
obj.conf
and
magnus.conf
files.
Replace
/usr/local/Xerox/Docushare
with the directory location where DocuShare is installed or
use the preconfigured lines from
<DocuShareInstallationDirectory>/tomcat/conf/jk/netscape/obj.conf
.
If you want to minimize the log file size, substitute
emerg
for
debug
. Only critical Tomcat/Sun Java
activities are logged.
Init fn="load-modules" funcs="jk_init,jk_service" shlib="/usr/local/Xerox/
Docushare/ds3-netscape-solaris/lib/nsapi_redirector.so"
Init fn="jk_init" worker_file="/usr/local/Xerox/Docushare/ds3-netscape-
solaris/config/workers.properties" log_level="debug"
log_file="/usr/local/Xerox/Docushare/ds3-netscape-solaris/config/nsapi.log"
Sun Java Web Server
DocuShare Installation Guide
B–15
2. Adding the name mapping.
Add the following lines to the beginning of the
NameTrans
section of the
obj.conf
file.
NameTrans fn="assign-name" from="/servlet/*" name="tcservlet"
NameTrans fn="assign-name" from="/examples/*" name="tcservlet"
NameTrans fn="assign-name" from="/docushare" name="tcservlet"
NameTrans fn="assign-name" from="/docushare/*" name="tcservlet"
3. Adding the service mapping.
Add the following lines to the end of the
obj.conf
file.
<Object name="tcservlet">
ObjectType fn=force-type type=text/plain
Service fn="jk_service" worker="ajp13"
</Object>
4. Restart the web server.
a. Stop the web server with the admin console.
b. Load the new configuration with the admin console.
c. Start the web server with the admin console.
This completes the Solaris Tomcat/Sun Java configuration. Connect to DocuShare Release 5/CPX
Release 5 through a browser of your choice at the location
http://<host>/docushare/
.
IIS Web server
B–16
DocuShare Installation Guide
IIS Web server
The DocuShare IIS install wizard will install and configure the DocuShare Release 5/CPX Release 5-IIS
software bridge. The DocuShare Release 5/CPX Release 5-IIS software bridge can be installed after
installing DocuShare Release 5/CPX Release 5.
The DocuShare Release 5/CPX Release 5-IIS bridge provides DocuShare servers to exist in a cluster
environment. This environment must be enabled and running before a backup DocuShare server in this
cluster environment can be activated.
Installing the IIS Web server
1. Log into the server as a Windows server administrator.
2. Insert the DocuShare CD-ROM into the server CD-ROM drive. In Windows Explorer, navigate to
\win32\cd\mx\platform\Win32\IIS.
3. Double-click
iistool.exe
. The installation program uses Java to install the product. It takes a few
minutes to unpack and install the Java files. The DocuShare IIS Software Bridge Welcome screen
displays at the completion of the Java installation.
4. Click
Next
to start the software bridge installation. The DocuShare IIS Software Bridge
Management tool window displays.
IIS Web server
DocuShare Installation Guide
B–17
5. Enter the appropriate information for the following fields.
•
Tomcat Bridge Port Number
•
IIS Port Number
•
DocuShare Root
•
Host DNS Name
Click
Next
to accept the defaults. The DocuShare root directory window displays.
6. Click
Next
. The DocuShare IIS Software Bridge installation summary window displays.
IIS Web server
B–18
DocuShare Installation Guide
7. Click
Next
to start the bridge installation.
8. When the installer completes the DocuShare bridge installation, click
Finish
to close the installer.
This completes the DocuShare Release 5/CPX Release 5-IIS software bridge installation.
DocuShare Installation Guide
C–1
Databases
This appendix provides configuration instructions for DocuShare Release 5/CPX Release 5 and optional
databases.
•
PostgreSQL on Linux . . . . . . . . . . . . . . . . . . . . . . . . . . . . . . . . . . . . . . . . . . . . . . . . . . . . . . . . .C–2
•
PostgreSQL on Solaris . . . . . . . . . . . . . . . . . . . . . . . . . . . . . . . . . . . . . . . . . . . . . . . . . . . . . . . .C–6
•
PostgreSQL with DocuShare on Windows . . . . . . . . . . . . . . . . . . . . . . . . . . . . . . . . . . . . . . . . C–11
•
Oracle database . . . . . . . . . . . . . . . . . . . . . . . . . . . . . . . . . . . . . . . . . . . . . . . . . . . . . . . . . . . .C–12
•
DB2 . . . . . . . . . . . . . . . . . . . . . . . . . . . . . . . . . . . . . . . . . . . . . . . . . . . . . . . . . . . . . . . . . . . . . .C–15
•
Creating DocuShare Tablespace . . . . . . . . . . . . . . . . . . . . . . . . . . . . . . . . . . . . . . . . . . . . . . .C–17
•
Upgrading PostgreSQL. . . . . . . . . . . . . . . . . . . . . . . . . . . . . . . . . . . . . . . . . . . . . . . . . . . . . . .C–18
PostgreSQL on Linux
C–2
DocuShare Installation Guide
PostgreSQL on Linux
DocuShare Release 5/CPX Release 5 has been tested with PostgreSQL 8.0.3 that is available with
RedHat Enterprise Linux ES v4.0 for 32 bit x86, SuSE 8.0 Standard Server, and SuSE Enterprise Server 9.
The DocuShare team compiled PostgreSQL with the source code from the PostgreSQL main site.
Note:
At the time this procedure was developed, PostgreSQL 8.0.3 was not available directly from
RedHat or SuSE.
This section describes the additional configuration required for PostgreSQL to support DocuShare
Release 5/CPX Release 5. The three main requirements are:
•
confirm that PostgreSQL is installed and running
•
provide a tablespace for DocuShare Release 5/CPX Release 5 to use (Creating DocuShare
Tablespace on page C–17)
•
allow TCP/IP connectivity for the JDBC database driver.
Included in the DocuShare Release 5/CPX Release 5 common directory is the GNU source for
PostgreSQL 8.0.3 against which DocuShare Release 5/CPX Release 5 was developed and tested. Also
included in the Linux are compiled versions of PostgreSQL for RedHat Enterprise Linux ES v4.0, SuSE 8.0
Standard Server, and SuSE Enterprise Server 9. If you do not already have PostgreSQL 8.0.3 or higher
installed on your target system, use one of the two images to install and configure PostgreSQL.
Verifying PostgreSQL
To verify that PostgreSQL is installed and running, run this command,
ps -elf | grep postmaster
. If the
following or similar response displays, then PostgreSQL is running.
000 S postgres 875 871 0 69 0 - 1262 do_sel Nov11 ? 00:00:01 /usr/bin/
postmaster -i
The executable for PostgreSQL is
postmaster
. If postmaster is not running, it may be installed but not
started at boot up.
1. To switch postmaster on at boot up, enter the command,
ntsysv
. To run the ntsysv utility, you must
be logged in as
root
.
2. Scroll down to the PostgreSQL service and press the space bar to add an asterisk to the service
listing. This will start PostgreSQL the next time the system is booted.
3. If you do not want to reboot the system to start PostgreSQL, log into the system as the user,
postgres
, and enter the command,
postmaster -i &
.
This will start PostgreSQL. If you do not find
postgresql
service when using ntsysv, then
postgresql service may not be installed. Install the PostgreSQL RPM from the Red Hat installation
disks and set it to start at boot up with the ntsysv utility.
PostgreSQL on Linux
DocuShare Installation Guide
C–3
Installing PostgreSQL with the compiled version
PostgreSQL 8.0.3 was compiled on Red Hat Enterprise Linux ES using gcc 3.4.3 and SuSE 9 using gcc
3.3.3. It was compiled with locales enabled to allow DocuShare to operate with languages other than
English and configured to be installed at
/usr/local/pgsql803
.
To install PostgreSQL:
Tech Note:
The binary was compiled for each of the supported Linux platforms. In the following example,
replace <platform> with
rhel4
for the <platform> value RedHat Enterprise Linux ES and
suse
for SuSE 8.0 Standard Server and SuSE 9.0 Enterprise Server. Due to your system version
and individual preferences and setup, the commands may differ from those shown in the
example.
1. Unpack the binary image.
su
cd /usr/local
cp <cd location>/platform/Linux/PostgreSQL/postgresql-8.0.3-bin-
<platform>.tar.gz /usr/local
gunzip postgresql-8.0.3-bin<platform>.tar.gz
tar -xvf postgresql-8.0.3-bin<platform>.tar
2. Configure the install image along with the target machine.
adduser postgres
mkdir /usr/local/pgsql803/data
chown postgres /usr/local/pgsql803/data
su - postgres
/usr/local/pgsql803/bin/initdb -D /usr/local/pgsql803/data
/usr/local/pgsql803/bin/pg_ctl -D /usr/local/pgsql803/data -1 logfile
start
/usr/local/pgsql803/bin/createdb test
/usr/local/pgsql803/bin/psql test
This completes the PostgrSQL installation for Linux using the compiled version.
3. Go to Linux TCP/IP Connectivity on page C–5
.
Installing PostgreSQL with the source version
This section provides instructions for installing PostgreSQL 8.0.3 by compiling the source code.
The requirements for this PostgreSQL installation is a C++ compiler and GNU make. If you do not have
these installed, you can install them from the Red Hat installation disks. After you have verified that there is
a C++ compiler and GNU make, unpack the PostgreSQL source.
PostgreSQL on Linux
C–4
DocuShare Installation Guide
The configure command includes the switch to enable locales if you want to add other languages to
DocuShare.
For example, using the
/opt/pgsql
directory:
cd /opt
mkdir pgsql
cd pgsql
cp <cd location>/platform/Linux/PostgreSQL/postgresql-8.0.3.tar.gz.
gunzip postgresql-8.0.3.tar.gz
tar -xvf postgresql-8.0.3.tar
cd postgresql-8.0.3
./configure --enable-locale --enable-multibyte
make
su
make install
adduser postgres
mkdir /usr/local/pgsql/data
chown postgres /usr/local/pgsql/data
su - postgres
/usr/local/pgsql/bin/initdb -D /usr/local/pgsql/data
/usr/local/pgsql/bin/pg_ctl -D /usr/local/pgsql/data -1 logfile start
/usr/local/pgsql/bin/createdb test
/usr/local/pgsql/bin/psql test
Tech Note:
There are installation instructions at
/opt/pgsql/postgresql-8.0.3/INSTALL
that will assist
you if the defaults are not sufficient.
This completes the PostgrSQL installation for Linux using the source version. Go to Linux TCP/IP
Connectivity on page C–5.
PostgreSQL on Linux
DocuShare Installation Guide
C–5
Linux TCP/IP Connectivity
If this has not been done, set PostgreSQL to allow TCP/IP connectivity.
To enable PostgreSQL TCP/IP connectivity.
1. Log into the system as either
root
or
postgres
.
2. Change directory to the PostgreSQL configuration data directory. A typical RedHat directory
location is
/var/lib/pgsql/data
.
3. Verify the installed version of PostgreSQL by checking the contents in the
PG_VERSION
file.
For PostgreSQL v8.0 and higher
To enable PostgreSQL TCP/IP connectivity:
1. Shutdown PostgreSQL.
2. Cd to
/usr/local/pgsql/bin
.
3. Enter
./pg_ctl stop -D /usr/local/pgsql803/data -m smart
.
4. Update the
/usr/local/pgsql/data/postgresql/postmast.conf
file to start postmaster with the
TCP/IP connectivity option.
5. Edit the line: #listen_addresses = 'local_host' to
listen_addresses = '*'
.
This has the PostgreSQL engine listening to any TCP/IP sockets. You need to setup the
permission for the the specific TCP/IP address you are to connect.
6. Update the
pg_hba.conf
file to allow TCP/IP connectivity to the database.
There are examples of different connection options within the file. DocuShare Release 5/CPX
Release 5 was tested with the following line added to the bottom of the file.
host all all x.x.x.x /32 trust
The x.x.x.x is the IP address of the target machine. This line allows all users on the target machine
to connect to PostgreSQL. You can adjust the configuration to map to the standards within your
organization.
7. Restart PostgreSQL to create the DocuShare tablespace.
a. Cd to
/usr/local/pgsql803/bin
.
b. Enter
./pg_ctl start -D /usr/local/pgsql803/data start
.
This completes the TCP/IP connectivity for PostgreSQL v8.0 and higher.
PostgreSQL on Solaris
C–6
DocuShare Installation Guide
PostgreSQL on Solaris
DocuShare Release 5/CPX Release 5 installation on a Solaris machine using the PostgreSQL database
requires that the target database be installed and running. Solaris does not install PostgreSQL This section
describes the additional configuration required for PostgreSQL to support DocuShare Release 5/CPX
Release 5. The three main requirements are:
•
confirm that PostgreSQL is installed and running
•
provide a tablespace for DocuShare Release 5/CPX Release 5 to use (Creating DocuShare
Tablespace on page C–17)
•
allow TCP/IP connectivity for the JDBC database driver.
Included in the DocuShare Release 5/CPX Release 5 common directory is the GNU source for
PostgreSQL 8.0.3 that DocuShare Release 5/CPX Release 5 was developed and tested. Also included is
a compiled version of PostgreSQL 8.0.3. If you do not already have PostgreSQL installed on your target
machine, use one of the two images to install and configure PostgreSQL.
Verifying PostgreSQL
To verify that PostgreSQL is installed and running, run this command,
ps -elf | grep postmaster
. If the
following or similar response displays, then PostgreSQL is running.
000 S postgres 875 871 0 69 0 - 1262 do_sel Nov11 ? 00:00:01 /usr/bin/
postmaster -i
The executable for PostgreSQL is
postmaster
. If postmaster is not running, it may be installed but not
started at boot up.
Installing PostgreSQL with the compiled version
This version of PostgreSQL was compiled on Solaris 2.9 using gcc 3.2.3. It was compiled with locales
enabled to allow DocuShare to operate with languages other than English and configured to be installed at
/usr/local/pgsql803
. It was also compiled without the open source library
readline
. One shared library,
libgcc 3.3
, must be installed before using PostgreSQL. This is required only if this library is not installed.
The
pkgadd
binaries for this shared library has been included on the CD to allow quick installation. In
addition, add
/usr/local/lib
to the
LD_LIBRARY_PATH
shell variable for the account that will run
PostgreSQL.
If you are installing the two shared libraries, use the following instructions. They will be installed into
/usr/
local/lib
.
Tech Note:
Replace <version> with
sol8
for Solaris 8 and
sol9
for Solaris 9. Due to your system version
and individual preferences and setup, the commands may differ from those shown in the
example.
To install the required shared library:
1. Unpack the binary image for libgcc.
su
cd /tmp
PostgreSQL on Solaris
DocuShare Installation Guide
C–7
cp <cd location>/platform/Solaris/PostgreSQL/libgcc-3.3-<platform>-
sparc-local.gz
gunzip libgcc-3.3-<platform>-sparc-local.gz
2. Use pkgadd to install.
pkgadd -d libgcc-3.3-<platform>-sparc-local
To install PostgreSQL:
1. Unpack the binary image.
su
cd /usr/local
cp <cd location>/platform/Solaris/PostgreSQL/postgresql-8.0.3-bin.tar.gz
gunzip postgresql-8.0.3-bin.tar.gz
tar -xvf postgresql-8.0.3-bin.tar
2. Configure the install image along with the target machine.
useradd postgres
mkdir /usr/local/pgsql803/data
chown postgres /usr/local/pgsql803/data
su - postgres
PATH=/usr/local/pgsql803/bin:$PATH
LD_LIBRARY_PATH=/usr/local/lib
export LD_LIBRARY_PATH
initdb -D /usr/local/pgsql803/data
/usr/local/pgsql803/bin/initdb -D /usr/local/pgsql803/data
/usr/local/pgsql803/bin/pg_ctl -D /usr/local/pgsql803/data -1 logfile
start
/usr/local/pgsql803/bin/createdb test
/usr/local/pgsql803/bin/psql test
This completes the PostgreSQL installation for Solaris using the compiled version.
3. Go to Solaris TCP/IP Connectivity on page C–9
.
Installing PostgreSQL with the source version
This section provides instructions for installing PostgreSQL 8.0.3 by compiling the source code.
The requirements of this PostgreSQL installation is a C++ compiler and GNU make. If you do not have
these installed, you can download them from http://www.sunfreeware.com/
.
You also need the shared library
readline 4.3
. If you do not want to download and install readline you must
compile PostgreSQL without reference to the library. You do not need to install
libgcc
as it will be installed
when the gcc compiler is installed. Make sure to download and install the software that matches the
version of Solaris on the target machine.
To install the required shared library:
PostgreSQL on Solaris
C–8
DocuShare Installation Guide
1. Unpack the binary image for libgcc.
su
cd /tmp
cp <cd location>/platform/Solaris/PostgreSQL/libgcc-3.3-<platform>-
sparc-local.gz
gunzip libgcc-3.3-<platform>-sparc-local.gz
2. Use pkgadd to install.
pkgadd -d libgcc-3.3-<platform>-sparc-local
After you have verified that there is a C++ compiler and GNU make, unpack the PostgreSQL source.
The configure command includes the switch to enable locales if you want to add other languages to
DocuShare. For example, using the
/opt/pgsql803
directory:
cd /opt
mkdir pgsql
cd pgsql
cp <cd location>/platform/common/PostgreSQL/postgresql-8.0.3 tar.gz
gunzip postgresql-8.0.3.tar.gz
tar -xvf postgresql-8.0.3.tar
cd postgresql-8.0.3
./configure --enable-locale --enable-multibyte
Tech Note:
If you do not use the open source library
readline
, change the configure command to
./configure --enable-locale --enable-multibyte --without-readline
make
su
make install
useradd postgres
mkdir /usr/local/pgsql/data
chown postgres /usr/local/pgsql/data
su - postgres
PATH=/usr/local/pgsql803/bin:$PATH
LD_LIBRARY_PATH=/usr/local/lib
export LD_LIBRARY_PATH
initdb -D /usr/local/pgsql803/data
/usr/local/pgsql/bin/initdb -D /usr/local/pgsql/data
/usr/local/pgsql/bin/pg_ctl -D /usr/local/pgsql/data -1> logfile start
/usr/local/pgsql/bin/createdb test
/usr/local/pgsql/bin/psql test
PostgreSQL on Solaris
DocuShare Installation Guide
C–9
Tech Note:
There are installation instructions at
/usr/local/pgsql/INSTALL
that will assist you if the
defaults are not sufficient.
This completes the PostgreSQL installation for Solaris using the source version. Go to Solaris TCP/IP
Connectivity on page C–9.
Shared memory
If you have a problem starting PostgreSQL because of insufficient shared memory segments, you can
increase the memory segments. As root,
cd
to the
/etc/system
directory and add the following lines to the
system file. Check to see if there are already similar values in the system file.
* Start of lines for shared memory needed for PostgreSQL
set maxusers=512
set shmsys:shminfo_shmmax=67108864
set shmsys:shminfo_shmmin=1
set shmsys:shminfo_shmmni=600
set shmsys:shminfo_shmseg=100
* End of lines for shared memory needed for PostgreSQL
After adding the lines reboot the server for the new values to be applied.
Solaris TCP/IP Connectivity
If this has not been done, set PostgreSQL to allow TCP/IP connectivity.
To enable PostgreSQL TCP/IP connectivity.
1. Log into the system as either
root
or
postgres
.
2. Change directory to the PostgreSQL configuration data directory. A typical Solaris directory
location is
/usr/local/pgsql803/data
.
3. Verify the installed version of PostgreSQL by checking the contents in the
PG_VERSION
file.
For PostgreSQL v8.0 and higher
To enable PostgreSQL TCP/IP connectivity:
1. Shutdown PostgreSQL.
2. Cd to
/usr/local/pgsql803/bin
.
3. Enter
./pg_ctl stop -D /usr/local/pgsql803/data -m smart
.
4. Update the
/usr/local/pgsql803/data/postgresql.conf
file to start postmaster with the TCP/IP
connectivity option.
5. Edit the line: #listen_addresses = 'local_host' to
listen_addresses = '*'
.
This has the PostgreSQL engine listening to any TCP/IP sockets. You need to setup the
permission for the the specific TCP/IP address you are to connect.
6. Update the
pg_hba.conf
file to allow TCP/IP connectivity to the database.
PostgreSQL on Solaris
C–10
DocuShare Installation Guide
There are examples of different connection options within the file. DocuShare Release 5/CPX
Release 5 was tested with the following line added to the bottom of the file.
host all all x.x.x.x /32 trust
The x.x.x.x is the IP address of the target machine. This line allows all users on the target machine
to connect to PostgreSQL. You can adjust the configuration to map to the standards within your
organization.
7. Restart PostgreSQL to create the DocuShare tablespace.
a. Cd to
/usr/local/pgsql803/bin
.
b. Enter
./pg_ctl start -D /usr/local/pgsql803/data start
.
This completes the TCP/IP connectivity for PostgreSQL v8.0 and higher.
PostgreSQL with DocuShare on Windows
DocuShare Installation Guide
C–11
PostgreSQL with DocuShare on Windows
DocuShare Release 5/CPX Release 5 has been tested with PostgreSQL 8.0.3 that was installed on
RedHat Enterprise Linux ES v4.0 for 32 bit x86, SuSE 8.0 Standard Server, SuSE Enterprise Server 9,
Solaris 8, and Solaris 9. The standard DocuShare installation for the Windows platform uses the MSDE
database.
This section describes the additional configuration required for PostgreSQL installed on Linux to support
DocuShare Release 5/CPX Release 5. The three main requirements are:
•
confirm that PostgreSQL is installed and running
•
provide a tablespace for DocuShare Release 5/CPX Release 5 to use (Creating DocuShare
Tablespace on page C–17)
•
allow TCP/IP connectivity for the JDBC database driver.
Verifying PostgreSQL
To verify that PostgreSQL is installed and running, run this command,
ps -elf | grep postmaster
. If the
following or similar response displays, then PostgreSQL is running.
000 S postgres 875 871 0 69 0 - 1262 do_sel Nov11 ? 00:00:01 /usr/bin/
postmaster -i
The executable for PostgreSQL is
postmaster
. If postmaster is not running, it may be installed but not
started at boot up.
1. To switch postmaster on at boot up, enter the command,
ntsysv
. To run the ntsysv utility, you must
be logged in as
root
.
2. Scroll down to the PostgreSQL service and press the space bar to add an asterisk to the service
listing. This will start PostgreSQL the next time the system is booted.
3. If you do not want to reboot the system to start PostgreSQL, log into the system as the user,
postgres
, and enter the command,
postmaster -i &
.
This will start PostgreSQL. If you do not find
postgresql
service when using ntsysv, then
postgresql service may not be installed. Install the PostgreSQL rpm from the Red Hat installation
disks and set it to start at boot up with the ntsysv utility.
Windows TCP/IP Connectivity
If this has not been done, set PostgreSQL to allow TCP/IP connectivity. Go to Linux TCP/IP Connectivity
on page C–5
Oracle database
C–12
DocuShare Installation Guide
Oracle database
A typical DocuShare Release 5/CPX Release 5 and Oracle installation requires that the Oracle database
administrator create a DocuShare Release 5/CPX Release 5 Oracle user and tablespace before starting
the DocuShare Release 5/CPX Release 5 installation. The DocuShare Release 5/CPX Release 5 install
wizard uses the Oracle user and tablespace to create the DocuShare tables, then populate the tables with
initial DocuShare data.
Tech Note:
Oracle 9.2.0 requires server patch set 9.2.0.4.
The DocuShare Release 5/CPX Release 5 install wizard can automate these steps if the following pre-
install conditions are done:
•
You must have an Oracle system manager password. The DocuShare Release 5/CPX Release 5
install wizard uses the system manager account to create a new DocuShare/Oracle user account
and to designate the new tablespace as the default for the new DocuShare/Oracle account.
•
The user account that DocuShare Release 5/CPX Release 5 install wizard creates does not
already exist.
•
The tablespace that DocuShare Release 5/CPX Release 5 install wizard creates does not already
exist.
•
Designated location on the Oracle system that has the required space for the new tablespace files.
Caution: If your system will be operating with multibyte characters, ensure that your database
character encoding is set to AL32UTF8. Refer to your Oracle database documentation for
details.
If your DocuShare Release 5/CPX Release 5 and Oracle pre-installation meet all the conditions, the
DocuShare Release 5/CPX Release 5 install wizard will:
1. Create a new Oracle user for DocuShare Release 5/CPX Release 5 to use.
2. Create a new default tablespace for the Oracle user.
3. Create the DocuShare Release 5/CPX Release 5 tables.
4. Populate the DocuShare Release 5/CPX Release 5 tables with initial data.
Tech Note:
If the Oracle database administrator has created the tablespace for DocuShare Release 5/
CPX Release 5, the install wizard will use this tablespace and perform steps 3 and 4.
These steps are performed in this order; if any step fails, the install wizard aborts the installation.
Oracle database
DocuShare Installation Guide
C–13
Tablespace creation script example
If you are using an existing Oracle database for DocuShare or prefer to create and define an Oracle
tablespace manually, the following is an example of a typical DocuShare tablespace creation script.
CREATE TABLESPACE <name> DATAFILE <file> SIZE <size> DEFAULT STORAGE (INITIAL
500K NEXT 256K MINEXTENTS 1 MAXEXTENTS UNLIMITED PCTINCREASE 0) PERMANENT;
Recommended database settings
•
Set
cursor_sharing
to
FORCE
—This allows Oracle to recognize and cache similar queries.
•
Set
Shared Pool
to have a minimum:
– 40 Mb
– 32 Mb Buffer Cache
– 1024 Kb Large Pool—DocuShare can run with a Java Pool of zero; DocuShare does not use
server side Java code or depend on the Java Pool.
•
Set
SGA_MAX_SIZE
to the maximum allowed. This must be larger than the sizes of the different
pools in the System Global area—such as buffer cache, shared pool, and large pool.
•
Set the
SHARED_POOL_RESERVED_SIZE
value to 10% of the SHARED_POOL_SIZE to avoid
an Oracle error (ORA-04031). In some default installations, it is set to 1%.
•
Set No-Sort option to
enabled
.
Tech Note:
If an ORA-600 error is encountered using an Oracle version prior to 9.2.0.4, it is required to
upgrade your database to 9.2.0.4 or set the no-sort option by setting event 10119.
User privileges
DocuShare 4.x or older provides the Connect role that allow DocuShare users to create Oracle db
connections, table, and sequence privileges. When upgrading from DocuShare 4.x or older to DocuShare
CPX Release 5, an additional role, CTXAPP, must be granted to Oracle database users. This additional
role is required by DocuShare Extensible Database Service (XDB) for CPX.
Note:
New DocuShare CPX Release 5 installation automatically grants both Connect and CTXAPP roles
to the DocuShare user.
Check with your database administrator to grant the CTXAPP role to DocuShare users. The DBA can
grant this role by logging on as SYSTEM, or as a user with DBA privileges and entering:
SQL> GRANT CTXAPP to <DS user>
Oracle database
C–14
DocuShare Installation Guide
Version 10g, R2
For Oracle 10g, Release 2, the Connect role has been stripped of the create table and create sequence
privileges; so now these privileges need to be explicitly restored separately. If Oracle 9.x or 10.1 users are
upgraded to 10.2 or later, the users need to make sure that these roles are present:
•
Connect
•
Create table
•
Create Sequence
•
CTXAPP
All these roles can be granted simultaneously by entering:
SQL> GRANT Connect, Create Table, Create Sequence, CTXAPP to <DS User>;
DB2
DocuShare Installation Guide
C–15
DB2
A typical Docushare and DB2 installation requires that the DB2 database administrator create a user and a
database for Docushare to connect to before starting the DocuShare Release 5/CPX Release 5
installation. The database administrator can choose to create the tablespaces manually and during the
DocuShare installation, specify the tablespaces to use, or let the DocuShare install wizard create them.
Tech Note:
If the database administrator chooses to create the tablespaces manually, all tablespaces
must have a 32K bufferpool. Docushare requires both a Regular tablespace and System
temporary tablespace with 32K bufferpools. The database administrator can optionally
provide a large tablespace to store LOBs and an index tablespace to store indexes.
The DocuShare Release 5/CPX Release 5 install wizard can automate these steps if the following pre-
install conditions are done:
•
DB2 username and password.
•
Database name.
•
A tablespace name that the DocuShare install wizard creates does not already exist.
•
Designated location on the DB2 system must have the required space for the new tablespace file.
If your DocuShare Release 5/CPX Release 5 and DB2 pre-installation meet all the conditions, the
DocuShare Release 5/CPX Release 5 install wizard will:
1. Create a regular tablespace with a 32K bufferpool.
2. Create a temporary system tablespace with a 32K bufferpool.
3. Create the DocuShare Release 5/CPX Release 5 tables.
4. Populate the DocuShare Release 5/CPX Release 5 tables with initial data.
Tech Note:
If the DB2 database administrator has created the tablespace for DocuShare Release 5/CPX
Release 5, the DocuShare install wizard will use this tablespace and perform steps 3 and 4.
These steps are performed in this order; if any step fails, the install wizard aborts the installation.
Tablespace creation script example
If you are using an existing DB2 database for DocuShare or prefer to create and define an DB2 tablespace
manually, the following is an example of a typical DocuShare tablespace creation script.
CREATE BUFFERPOOL DSBP IMMEDIATE SIZE 250 PAGESIZE 32 K ;
CREATE REGULAR TABLESPACE DSDATADMS PAGESIZE 32 KMANAGED BY DATABASE USING
(FILE 'C:\DB2\DB2Data\DSData' 3200)EXTENTSIZE 16 OVERHEAD 10.5 PREFETCHSIZE
16 TRANSFERRATE 0.14 BUFFERPOOL DSBP DROPPED TABLE RECOVERY ON;
CREATE LARGE TABLESPACE DSLargeDms PAGESIZE 32 K MANAGED BY DATABASE USING
(FILE 'C:\DB2\DB2Data\Docushare' 3200) EXTENTSIZE 16 OVERHEAD 10.5
PREFETCHSIZE 16 TRANSFERRATE 0.14 BUFFERPOOL DSBP ;
DB2
C–16
DocuShare Installation Guide
CREATE SYSTEM TEMPORARY TABLESPACE DSTEMPDMS PAGESIZE 32 K MANAGED BY SYSTEM
USING ('C:\DB2\DB2Temp') EXTENTSIZE 16 OVERHEAD 10.5 PREFETCHSIZE 16
TRANSFERRATE 0.14 BUFFERPOOL DSBP;
Recommended database settings
•
Set
cursor_sharing
to
FORCE
—This allows DB2 to recognize and cache similar queries.
•
Set
Shared Pool
to have a minimum:
– 40 Mb
– 32 Mb Buffer Cache
– 1024 Kb Large Pool—DocuShare can run with a Java Pool of zero; DocuShare does not use
server side Java code or depend on the Java Pool.
•
Set
SGA_MAX_SIZE
to the maximum allowed. This must be larger than the sizes of the different
pools in the System Global area—such as buffer cache, shared pool, and large pool.
•
Set the
SHARED_POOL_RESERVED_SIZE
value to 10% of the SHARED_POOL_SIZE to avoid
an DB2 error (ORA-04031). In some default installations, it is set to 1%.
•
Set No-Sort option to
enabled
.
Creating DocuShare Tablespace
DocuShare Installation Guide
C–17
Creating DocuShare Tablespace
During the DocuShare Release 5/CPX Release 5 installation (new install), the install wizard creates the
tablespace before creating the database tables. If you need to manually create a tablespace before
installing DocuShare Release 5/CPX Release 5, use the following procedure.
To create a tablespace manually:
1. Log into the target system as
postgres
.
2. Enter the command,
createdb –E UNICODE <DocuShare Tablespace Name>
.
This creates the tablespace for DocuShare Release 5/CPX Release 5 to use. You can enter any
tablespace name, but be sure to record the tablespace name. During the DocuShare Release 5/CPX
Release 5 installation, you are prompted for a tablespace name that will be entered into the DocuShare
Release 5/CPX Release 5 database schema.
Upgrading PostgreSQL
C–18
DocuShare Installation Guide
Upgrading PostgreSQL
The internal data storage format changes with new releases of PostgreSQL. Therefore, if you are
upgrading an existing installation that does not have a version number
8.0.x
, you must backup and restore
your data as described in the following section. These instructions assume that your existing installation is
in the /usr/local/pgsql directory, and that the data area is in /usr/local/pgsql/data. Substitute your
pathnames appropriately.
1. Make sure that your database is not updated during or after the backup. This does not affect the
integrity of the backup, but the updated data will not be included. If necessary, edit the permissions
in the file,
/usr/local/pgsql/data/pg_hba.conf
(or equivalent) to disable access to other users.
2. To backup your database installation, enter:
pg_dumpall > outputfile
.
If you need to preserve OIDs, when using them as foreign keys, use the
-o
option when running
pg_dumpall
. pg_dumpall does not save large objects.
Tech Note:
To make a backup, you can use the
pg_dumpall
command from your current PostgreSQL
version. For best results, use the pg_dumpall command from PostgreSQL 8.0.3 as this
contains the latest bug fixes and improvements. It is recommended to install the new version
in parallel with the older version to decrease downtime in which data can be transferred after
installation is completed.
Resources:
Check the
PostgreSQL Manual, Section 22.1.4
, for details.
3. If you are installing the new PostgreSQL version in the same location as the current version,
perform the following:
a. Shut down the old server before installing the new files.
•
To stop the server, enter
pg_ctl stop
.
•
On systems that have PostgreSQL started at system boot, there is probably a start-up file that
accomplishes the same thing. For example, on a Red Hat Linux system, it is possible that
/etc/
rc.d/init.d/postgresql stop
also works.
b. Old versions may not have
pg_ctl
. If you cannot locate the file or it does not work, perform the
following:
•
Ascertain the processor ID for the server; enter
ps ax | grep postmaster
.
•
Enter
kill -INT processed
.
4. If you are installing the new PostgreSQL version in the same location as the current version, it is
recommended to move the old PostgreSQL to a temporary directory in case it is necessary to
revert back to the previous version. To move the current PostgreSQL to another directory, enter:
mv /usr/local/pgsql /usr/local/pgsql.old
5. After you have installed PostgreSQL 8.0.3, create a new database directory and start the new
server.You must execute these commands while logged in to the special database user account
(which exists if you are upgrading).
/usr/local/pgsql/bin/initdb -D /usr/local/pgsql/data
/usr/local/pgsql/bin/postmaster -D /usr/local/pgsql/data
Upgrading PostgreSQL
DocuShare Installation Guide
C–19
6. Restore your data; using the new psql, enter
/usr/local/pgsql/bin/psql -d template1 -f outputfile
Resources:
For details refer to
PostgreSQL manual, Section 22.4
.
Upgrading PostgreSQL
C–20
DocuShare Installation Guide
DocuShare Installation Guide
D–1
DocuShare Add-ons
DocuShare add-ons are separately purchased licensed upgrades and features that can increase the
capacity and functionality of your DocuShare site.
This appendix contains:
•
Email Agent. . . . . . . . . . . . . . . . . . . . . . . . . . . . . . . . . . . . . . . . . . . . . . . . . . . . . . . . . . . . . . . . .D–2
•
Archive Server. . . . . . . . . . . . . . . . . . . . . . . . . . . . . . . . . . . . . . . . . . . . . . . . . . . . . . . . . . . . . . .D–4
•
Records Manager . . . . . . . . . . . . . . . . . . . . . . . . . . . . . . . . . . . . . . . . . . . . . . . . . . . . . . . . . . . .D–6
•
Content Encryption . . . . . . . . . . . . . . . . . . . . . . . . . . . . . . . . . . . . . . . . . . . . . . . . . . . . . . . . . . .D–8
Email Agent
D–2
DocuShare Installation Guide
Email Agent
The Email Agent add-on allows users to send email and attachments from any desktop to any collection or
group within a specific DocuShare site. The Email Agent also has the capability of using digital
authentication certificates for greater email security.
Use the following information to prepare and enable the DocuShare Email Agent add-on to interface with a
POP3 or IMAP mail server.
Note:
Email Agent requires DocuShare CPX Release 5 be installed. If DocuShare 4.0.1 is installed, you
must upgrade to DocuShare CPX Release 5. See upgrading DocuShare in the Windows or Linux/
Solaris chapters in this guide.
Enabling Email Agent on DocuShare
The Email Agent is a DocuShare add-on that requires a new license for your DocuShare site. See
Licensing on page 1–3 to obtain a new DocuShare license.
To enable your DocuShare server with Email Agent:
1. Log into the DocuShare server as admin, using the password you supplied during the installation.
2. On the navigation bar, click
Admin Home
.
3. From the Administration menu, click
Site Management | License
.
4. Copy the new license string from the Xerox Teleweb Center email.
5. Click
Apply
. In the Services Enabled section, Email Agent should be listed.
6. See your system administrator for domain, mail server, and digital certificate authorization
information and the
DocuShare Administrator Guide
for configuring the Email Agent.
Digital certificates
For greater email security, the Email Agent has the capability of using digital authentication certificates.
The digital ID is included with the watcher service and is used for decrypting the DocuShare server's
private key that is password protected.
In order for encrypted email to be sent to the DocuShare server, a request must be made to a DocuShare
administrator to send a signed email from the DocuShare server to the requestor. The requestor uses this
signed email to add the DocuShare server to their list of contacts in their email application.
Caution: The following information is only a temporary solution for email security. An included
sample digital certificate, sampleCA.cer, can be used temporarily for the Email Agent
add-on. It is recommended that a digital certification authority such as Verisign or an
equivalent vendor, or an in-house certification authority be used for issuing digital
certificates.
Email Agent
DocuShare Installation Guide
D–3
If the requestor's operating system does not have the Certification Authority (CA) in its list of trusted
authorities, the CA must be added by importing
sampleCA.cer
to their browser. The digital certificate,
sampleCA.cer, can be emailed to requestors by the administrator or extracted from the administrator’s
signed message. The sample certificate is stored with the watcher service in
../securemail/CA/
sampleCA.cer
.
For the DocuShare administrator to send the signed email from the DocuShare server account, the
administrator must be logged into the email application using the DocuShare server exchange account and
the certificate issued by the DocuShare email server. If a digital certification authority is not available,
digital certificates can be issued by the DocuShare site administrator.
Email encryption
For DocuShare Email Agent to handle encrypted emails, two jar files are downloaded from Sun
Microsystems and installed into the DocuShare directory.
Note:
Signed emails can be handled without this modification.
1. Download the
Java Cryptography Extension (JCE) Unlimited Strength Jurisdiction Policy
Files 1.4.2
from Sun Microsystems at: http://java.sun.com/j2se/1.4.2/download.html
.
2. Extract the jar files into a temp directory.
3. Copy or move the extracted files,
local_policy.jar
and
US_export_policy.jar
into
<DSHome>/jdk1.4.2/jre/lib/security.
4. Restart DocuShare.
Archive Server
D–4
DocuShare Installation Guide
Archive Server
The Archive Server add-on allows users to mark site documents and mail messages to be archived on an
external DocuShare Archive Server. The Archive Server requires creating a special DocuShare site that is
external to your main DocuShare site.
Note:
Archive Server requires DocuShare Release 5/CPX Release 5 be installed. If DocuShare 4.0.1 is
installed, you must upgrade to DocuShare Release 5/CPX Release 5. See upgrading DocuShare in
the Windows or Linux/Solaris chapters in this guide.
Use the following information to prepare and configure your systems as DocuShare archive client and
archive server.
Enabling Archive Client on DocuShare
The Archive Server is a DocuShare add-on that requires a new license for your DocuShare site. See
Licensing on page 1–3 to obtain a new DocuShare license.
To enable your DocuShare server as an Archive Client:
1. Log into the DocuShare server as admin, using the password you supplied during the installation.
2. On the navigation bar, click
Admin Home
.
3. From the Administration menu, click
Site Management | License
.
4. Copy the new license string from the Xerox Teleweb Center email.
5. Click
Apply
. In the Services Enabled section,
Archive Client
should be listed.
6. Restart your system to enable the Archive Client on DocuShare.
7. See your system administrator for domain and archive server information and the
DocuShare
Administrator Guide
for configuring the Archive Server.
Installing the DocuShare Archive server
After installing and enabling the Archive Client on the DocuShare server, DocuShare must be installed on
an external system designated as the DocuShare Archive server. Installing DocuShare Archive server is
similar to installing a DocuShare server. See Windows Server Installation or Solaris/Linux Server
Installation in this guide to install DocuShare Archive Server.
When the setup window displays (Figure D–1), click the option to install the DocuShare Archive Server and
follow the on-screen instructions to complete the installation.
Archive Server
DocuShare Installation Guide
D–5
Figure D–1: Option to install archive server
Enabling Archive Server on DocuShare
A separate license is required to enable the DocuShare Archive Server. See Licensing on page 1–3 to
obtain a new DocuShare license.
1. Log into the DocuShare server as admin, using the password you supplied during the installation.
2. On the navigation bar, click
Admin Home
.
3. From the Administration menu, click
Site Management | License
.
4. Copy the new license string from the Xerox Teleweb Center email.
5. Click
Apply
. In the Services Enabled section,
Archive Server
should be listed.
6. Restart your system to enable the Archive Server on DocuShare.
7. See your system administrator for domain and archive server information and the
DocuShare
Administrator Guide
for configuring the Archive Server.
Note:
If a DocuShare Archive Client had been installed prior to the Archive Server, restart the Archive
Client server in order to synchronize with the DocuShare Archive Server.
Records Manager
D–6
DocuShare Installation Guide
Records Manager
DocuShare Records Manager expands DocuShare’s content management features by enabling you to
create electronic records of your business-sensitive documents. Using DocuShare Records Manager
(DSRM), you can create records of documents and mail messages to preserve and safeguard their
content.
DocuShare Records Manager works with the IBM DB2 Records Manager (IRM) system. The record
information is stored in the IRM system, which manages the record’s life cycle and provides an audit trail.
To ensure the security of your stored records, DocuShare Records Manager is compliant with the U.S.
DoD 5015.2 standard.
Use the following information to prepare and configure your system as a DocuShare Records Manager
server.
Enabling Records Manager on DocuShare
The Records Manager is a DocuShare add-on that requires a new license for your DocuShare site. See
Licensing on page 1–3 to obtain a new DocuShare license.
To enable your DocuShare Records Manager:
1. Log into the DocuShare server as admin, using the password you supplied during the installation.
2. On the navigation bar, click
Admin Home
.
3. From the Administration menu, click
Site Management | License
.
4. Copy the new license string from the Xerox Teleweb Center email.
5. Click
Apply
. In the Services Enabled section,
Records Management
should be listed.
6. To start Records Manager, open a command window and enter:
a.
cd C:\Xerox\Docushare\bin
.
Records Manager
DocuShare Installation Guide
D–7
b.
monitor start RecordsMgmt
.
c. To check that Records Manager is started,, in the command window, enter
dsservice status
.
Records Manager should be started.
7. See your system administrator for domain and IBM Database Manager server information and the
DocuShare Administrator Guide
for configuring Records Manager.
Content Encryption
D–8
DocuShare Installation Guide
Content Encryption
DocuShare Content Encryption add-on protects your information by automatically encrypting the content of
a document when it is uploaded to DocuShare. The content is decrypted when users view or edit the
document (as allowed by DocuShare permissions).
The level of encryption that is used by DocuShare requires that each customer receiving the add-on must
be registered with the U.S. Federal government. When a customer orders the encryption package, Xerox
registers the customer with the government and then is sent the JAR file.
Use the following information to license and enable your system for content encryption.
Enabling Content Encryption on DocuShare
Content Encryption is a DocuShare add-on that requires a new license for your DocuShare site. See
Licensing on page 1–3 to obtain a new DocuShare license.
To enable your DocuShare server for content encryption:
1. Log into the DocuShare server as admin, using the password you supplied during the installation.
2. On the navigation bar, click
Admin Home
.
3. From the Administration menu, click
Site Management | License
.
4. Copy the new license string from the Xerox Teleweb Center email.
5. Click
Apply
. In the Services Enabled section,
Content Encryption
should be listed.
6. From the Administration menu, click
Site Management | Site Configuration
.
7. Click
Yes
to enable Content Encryption.
Note:
Once Content Encryption is enabled, any document contents uploaded and stored on DocuShare
are now encrypted. Any previous stored contents are not encrypted.
DocuShare Installation Guide
Glossary–1
Glossary
This glossary contains definitions for terminology used in DocuShare. Click any letter below to
navigate to that section of the glossary.
ABCDEFGHI J KL M
NOPQRSTUVWXYZ
A
Glossary–2
DocuShare Installation Guide
A
ACL—Access Control List
A table that tells a computer operating system which access rights each user has to a particular system
object, such as a file directory or individual file. Each object has a security attribute that identifies its access
control list. The list has an entry for each system user with access privileges. The most common privileges
include the ability to read a file (or all the files in a directory), to write to the file or files, and to execute the
file (if it is an executable file or program). Microsoft Windows NT/2000, Novell's NetWare, Digital's
OpenVMS, and UNIX-based systems are among the operating systems that use access control lists. The
list is implemented differently by each operating system.
Amber servlet
Web UI generator that provides backward compatibility for DS 2.x VDF templates. Migrating
customizations from a DS 2.x site into the new templates should be straightforward for upgrades.
Administration servlet
Administrator UI generator that uses Java Server Pages (JSP).
API—Application Program Interface
A set of routines, protocols, and tools for building software applications. A good API makes it easier to
develop a program by providing all the building blocks. A programmer puts the blocks together.
Applet
A program designed to be executed from within another application. Unlike an application, applets cannot
be executed directly from the operating system.
Web browsers, which are often equipped with Java virtual machines, can interpret applets from Web
servers. Because applets are small in files size, cross-platform compatible, and highly secure (cannot be
used to access users' hard drives), they are ideal for small Internet applications accessible from a browser.
A
DocuShare Installation Guide
Glossary–3
Application Service Provider (ASP)
A third-party entity that manages and distributes software-based services and solutions to customers
across a wide area network from a central data center. ASPs are a way for companies to outsource some
or almost all aspects of their information technology needs.
ASPs are grouped into five subcategories:
• Enterprise ASPs—deliver high-end business applications.
• Local/Regional ASPs—supply wide variety of application services for smaller businesses in a local area.
• Specialist ASPs— provide applications for a specific need, such as Web site services or human
resources.
• Vertical Market ASPs—provide support to a specific industry, such as healthcare.
• Volume Business ASPs—supply general small/medium-sized businesses with prepackaged application
services in volume.
Authentication SPI (Service Provider Interface)
Handles user authentication. Internal Authentication handle local users created and managed in
DocuShare. LDAP uses JNDI for users created outside of DocuShare by an external LDAP Directory.
B
Glossary–4
DocuShare Installation Guide
B
BLOB—Binary Large Object
A collection of binary data stored as a single entity in a database management systems (DBMS). BLOBs
are used primarily to hold multimedia objects such as images, videos, and sound, though they can also be
used to store programs or even fragments of code. Not all DBMSs support BLOBs.
BLOG—Web Log
Short for We
b log
, a blog is a Web page that serves as a publicly-accessible personal journal for an
individual. Typically updated daily, blogs often reflect the personality of the author.
BSDDB—Berkeley UNIX Distribution Database
Originally from the Berkeley UNIX Distribution (BSD) the BSDDB is a simple hash file database used in
DocuShare 2.x and FX (Fuji Xerox) versions of Release 3.0. Xerox Corporation supports relational
databases using the JDBC interface (Java Database Connection API).
C
DocuShare Installation Guide
Glossary–5
C
CGI—Common Gateway Interface
A specification for transferring information between a World Wide Web server and a CGI program. A CGI
program is any program designed to accept and return data that conforms to the CGI specification.
The program could be written in any programming language, including C, Perl, Java, or Visual Basic.
CLI—Commandline Interface
Commonly referred to as the Commandline utilities. Uses the DocuShare Java API.
Compound Documents
DSDocument—a document consists of document properties and one or more versions. They are first class
DSObjects with a handle and ACL. This replaces the DocuShare 2.x File Object.
DSVersion—a version consists of version properties and one or more renditions. They are first class
DSObjects with a handle and ACL.
Saved HTML pages, MS-Word documents, and Outlook mail message are types of compound documents.
They contain hyperlinks and field codes that reference other files or objects. For example, an Outlook
email message with file attachments is a .msg file with field codes to the file attachments. These are stored
in DocuShare as single compound documents.
ContentElement
A ContentElement consists of ContentElement properties and a reference to a file stored in DocuShare
Content Store. ContentElements are not first class DSObjects and do not have a DocuShare Handle or an
ACL. ContentElements only exist in a single rendition, but may be shared between renditions in a future
release.
Content SPI (Service Provider Interface)
Interface for storing the document contents. File Access Impl provides storage of uploaded files in the file
system.
C
Glossary–6
DocuShare Installation Guide
Conversion SPI (Service Provider Interface)
Standardized interface for accessing Conversion Services. These services include:
• HTML Conversion to take editor source files and generate an HTML rendition.
• Text Extraction to generate a text stream from a source file.
• Summarization to create an abstract by extracting the key 6 sentences from a document.
• Thumbnailing to create a reduced picture of standard image files.
Other conversion services can be added (plugged in).
Custom Objects
Custom objects have their own custom properties that are separate from the properties of the parent class.
Allows the site and 3rd parties to define new objects classes such as special Document types or special
Collection classes.
New objects can be “cloned” from the existing classes of objects.
D
DocuShare Installation Guide
Glossary–7
D
Database SPI (Service Provider Interface)
Uses JDBC to support relational databases; a true relational schema with properties stored as columns in
the database: MSDE, SQL Server 7, or Oracle 9I.
Only metadata is stored in RDMS Oracle: Unlike DocuShare 2.x where an object and everything
associated with objects (such as properties) was stored in one BLOB. Property and Handle retrieval occur
together for improved performance, not as separate calls to the database.
Document Routing
Basic workflow module to route documents through an approval or review cycle with other DocuShare
users. Uses Javascript that must be enabled in the DocuShare server and in the client browser. Also
known as Workflow.
Directory SPI (Service Provider Interface)
Provides the interface for User and Group management. Internal Directory handles local users created and
managed in DocuShare. LDAP uses JNDI for users created outside of DocuShare by an external LDAP
Directory.
Domain Name System (DNS)
DNS short for Domain Name System (or Service), an Internet service that translates domain names into IP
addresses. Because domain names are alphabetic, they're easier to remember. The Internet however, is
really based on IP addresses. Every time you use a domain name, therefore, a DNS service must translate
the name into the corresponding IP address. For example, the domain name, www.example.com, might
translate to 198.105.232.4.
E
Glossary–8
DocuShare Installation Guide
E
EJB—Enterprise JavaBeans
A Java API developed by Sun Microsystems that defines a component architecture for multi-tier client/
server systems.
F
DocuShare Installation Guide
Glossary–9
F
G
Glossary–10
DocuShare Installation Guide
G
H
DocuShare Installation Guide
Glossary–11
H
hostname
The name assigned to a computer or server.
HTTP—HyperText Transfer Protocol
The underlying protocol used by the World Wide Web. HTTP defines how messages are formatted and
transmitted, and what actions Web servers and browsers should take in response to various commands.
For example, when you enter a URL in your browser, this actually sends an HTTP command to the Web
server directing it to fetch and transmit the requested Web page.
hyperlink
An element in an electronic document that links to another place in the same document or to an entirely
different document. Hyperlinks are the most essential ingredient of all hypertext systems, including the
World Wide Web.
The text in a link is usually blue and underlined.
I
Glossary–12
DocuShare Installation Guide
I
IP address
An identifier for a computer or device on a TCP/IP network. Networks using the TCP/IP protocol route
messages based on the IP (Internet Protocol) address of the destination. The format of an IP address is a
32-bit numeric address written as four numbers separated by periods. Each number can be zero to 255.
For example, 1.160.10.240 could be an IP address.
J
DocuShare Installation Guide
Glossary–13
J
Java
Java is a general purpose programming language with a number of features that make the language well
suited for use on the World Wide Web. Small Java applications are called Java applets and can be
downloaded from a Web server and run on your computer by a Java-compatible Web browser, such as
Netscape Navigator or Microsoft Internet Explorer.
JavaScript
A scripting language developed by Netscape to enable Web authors to design interactive sites. Although it
shares many of the features and structures of the full Java language, it was developed independently.
Javascript can interact with HTML source code, enabling Web authors to spice up their sites with dynamic
content. JavaScript is endorsed by a number of software companies and is an open language that anyone
can use without purchasing a license. It is supported by recent browsers from Netscape and Microsoft,
though Internet Explorer supports only a subset, which Microsoft calls Jscript.
JDBC—Java Database Connectivity
A Java API that enables Java programs to execute SQL statements. This allows Java programs to interact
with any SQL-compliant database. Since nearly all relational database management systems (DBMSs)
support SQL, and because Java itself runs on most platforms, JDBC makes it possible to write a single
database application that can run on different platforms and interact with different DBMSs.
JMS—Java Message Service
An application program interface (API) from Sun Microsystems that supports the formal communication
known as messaging between computers in a network. Sun's JMS provides a common interface to stan-
dard messaging protocols and also to special messaging services in support of Java programs. Sun advo-
cates the use of the Java Message Service for anyone developing Java applications, which can be run
from any major operating system platform.
JNDI—Java Naming and Directory Interface
JNDI is a standard extension to the Java platform, providing Java technology enabled applications with a
unified interface to multiple naming and directory services in the enterprise. As part of the Java Enterprise
API set, JNDI enables seamless connectivity to heterogeneous enterprise naming and directory services.
JNDI is an API specified in Java that provides naming and directory functionality to applications written in
Java. It is designed especially for Java by using Java's object model. Using JNDI, Java applications can
store and retrieve named Java objects of any type. In addition, JNDI provides methods for performing
standard directory operations, such as associating attributes with objects and searching for objects using
their attributes.
JVM—Java Virtual Machine
An abstract computing machine, or virtual machine, JVM is a platform-independent execution environment
that converts Java bytecode into machine language and executes it. Most programming languages
compile source code directly into machine code that is designed to run on a specific microprocessor
architecture or operating system, such as Windows or UNIX. A JVM—a machine within a machine --
mimics a real Java processor, enabling Java bytecode to be executed as actions or operating system calls
J
Glossary–14
DocuShare Installation Guide
on any processor regardless of the operating system. For example, establishing a socket connection from
a workstation to a remote machine involves an operating system call. Since different operating systems
handle sockets in different ways, the JVM translates the programming code so that the two machines that
may be on different platforms are able to connect.
JNDI is also defined to be independent of any specific naming or directory service implementation. It
enables Java applications to access different, possibly multiple, naming and directory services using a
common API. Different naming and directory service providers can be plugged in seamlessly behind this
common API. This allows Java applications to take advantage of information in a variety of existing naming
and directory services, such as LDAP, NDS, DNS, and NIS (YP), and allows Java applications to coexist
with legacy applications and systems.
JSP—Java Server Pages
A server-side technology, Java server pages are an extension to the Java servlet technology that was
developed by Sun as an alternative to Microsoft's ASPs (Active Server Pages). JSPs have dynamic
scripting capability that works in tandem with HTML code, separating the page logic from the static
elements -- the actual design and display of the page. Embedded in the HTML page, the Java source code
and its extensions help make the HTML more functional, being used in dynamic database queries, for
example. JSPs are not restricted to any specific platform or server.
K
DocuShare Installation Guide
Glossary–15
K
L
Glossary–16
DocuShare Installation Guide
L
LDAP—Lightweight Directory Access Protocol
A set of protocols for accessing information directories. LDAP is based on the standards contained within
the X.500 standard, but is significantly simpler. And unlike X.500, LDAP supports TCP/IP, which is
necessary for any type of Internet access. Because it's a simpler version of X.500, LDAP is sometimes
called X.500-lite.
LDAP Synchronization Service
An optional component that works with the External LDAP Auth and Directory IMPLs to maintain
synchronization between the Users and Groups in an external LDAP directory.
link
In hypertext systems, such as the World Wide Web, a link is a reference to another document. Such links
are sometimes called hot links because they take you to other document when you click on them.
The text in a link is usually blue and underlined.
Logging
All services and client applications include logging to provide performance data and record diagnostic
messages for reporting and troubleshooting.
Logging levels are:
• Fatal—always enabled. Errors which cause services or the server to be unavailable or dysfunctional.
• Error—fatal and general errors.
• Warning—warnings and error messages.
• Info—errors and informational messages.
• Trace—errors, informational, and troubleshooting data; used to diagnose problems by DocuShare sup-
port.
• Debug—all errors, informational, trace and other developer debugging messages.
By default only fatal errors are logged; additional logging can be enabled from the Administrator UI.
The Verity Search Service log list by handles which files failed indexing.
M
DocuShare Installation Guide
Glossary–17
M
metadata
Data about data. Metadata describes how and when and by whom a particular set of data was collected,
and how the data is formatted. Metadata is essential for understanding information stored in data
warehouses.
MIME—Multipurpose Internet Mail Extensions
A specification for formatting non-ASCII messages so that they can be sent over the Internet. Many email
clients now support MIME, which enables them to send and receive graphics, audio, and video files via the
Internet mail system. In addition, MIME supports messages in character sets other than ASCII.
There are many predefined MIME types, such as GIF graphics files and PostScript files. It is also possible
to define your own MIME types.
Monitor Service
Monitor service is responsible to start and keep DocuShare services running.
MSDE—Microsoft SQL Server Desktop Engine
The Microsoft SQL Server Desktop Engine is a data engine built and based on core SQL Server
technology. With support for single- and dual-processor desktop computers, MSDE is a reliable storage
engine and query processor for desktop extensions of enterprise applications.
Designed to run in the background, supporting transactional desktop applications, MSDE does not have its
own user interface (UI) or tools. Users interact with MSDE through the application in which it is embedded.
N
Glossary–18
DocuShare Installation Guide
N
Notification Queues
NotificationQ is used to queue events for the other services. IndexingQ will queue events for the Indexing/
Search service. SubscriptionQ will queue events for the Subscription service. SummarizationQ will queue
events for the Summarization service.
Other services and client will establish additional notification queues.
Notification SPI (Service Provider Interface)
An interface for generalized event notification between services and clients. JMS (Java Message System)
is the foundation for the Notification system.
O
DocuShare Installation Guide
Glossary–19
O
OCR
Optical Character Recognition refers to the branch of computer science that involves reading text from
paper and translating the images into a form that the computer can manipulate (for example, into ASCII
codes). An OCR system enables you to take a book or a magazine article, feed it directly into an electronic
computer file, and then edit the file using a word processor.
P
Glossary–20
DocuShare Installation Guide
P
PDF
Portable Document Format. A file format that captures all of the elements of a printed document as an
electronic image that you can view, navigate, print, or forward to someone else.
POP3
Post Office Protocol, a protocol used to retrieve email from a mail server. Most email applications
(sometimes called an email client) use the POP protocol, although some can use the newer IMAP (Internet
Message Access Protocol).
POP3, can be used with or without SMTP.
portal
An input device, such as a Document Centre or an Internet fax device.
PostScript
A page description language (PDL) developed by Adobe Systems. PostScript is primarily a language for
printing documents on laser printers, but it can be adapted to produce images on other types of devices.
PostScript is the standard for desktop publishing because it is supported by imagesetters, the very high-
resolution printers used by service bureaus to produce camera-ready copy.
Q
DocuShare Installation Guide
Glossary–21
Q
R
Glossary–22
DocuShare Installation Guide
R
Renditions
In DocuShare 3.0, the HTML rendition that is used for viewing many different file types within the web
browser.
DSRendition—a rendition consists of rendition properties and one or more ContentElements. Renditions
are first class DSObjects that include a handle and ACL.
RMI—Remote Method Invocation
A set of protocols developed by Sun's JavaSoft division that enables Java objects to communicate
remotely with other Java objects. RMI is a relatively simple protocol, but unlike more complex protocols
such as CORBA and DCOM, it works only with Java objects. CORBA and DCOM are designed to support
objects created in any language.
RDBMS—Relational Database Management System
A type of database management system (DBMS) that stores data in the form of related tables. Relational
databases are powerful because they require few assumptions about how data is related or how it will be
extracted from the database. As a result, the same database can be viewed in many different ways.
RSS—RDF Site Summary
RSS (RDF Site Summary - formerly called Rich Site Summary or Really Simple Syndication) is a method
of describing news or other web content that is available for distribution or syndication (feeding) from an
online publisher to Web users. RSS is an application of the Extensible Markup Language (XML) that
adheres to the World Wide Web Consortium's Resource Description Framework (RDF).
S
DocuShare Installation Guide
Glossary–23
S
ScanSoft, Inc.
A developer of digital imaging software that allows users to capture and convert paper documents and
photographs into digital files that can be easily edited, organized and shared on PCs and over the Internet.
Search/Indexing SPI (Service Provider Interface)
Provides a common interface for Searching services. R4.0 ships with the Verity Search/Indexing service to
manage property and content based indexing and search. Verity Search/Indexing Impl is the core search
implementation for Verity. VDK is the primary API to the Verity Search/Indexing libraries.
Servlet
An applet that runs on a server. The term usually refers to a Java applet that runs within a Web server
environment. This is analogous to a Java applet that runs within a Web browser environment.
Java servlets are becoming increasingly popular as an alternative to CGI programs. The biggest difference
between the two is that a Java applet is persistent. This means that once it is started, it stays in memory
and can fulfill multiple requests. In contrast, a CGI program disappears once it has fulfilled a request. The
persistence of Java applets makes them faster because there's no wasted time in setting up and tearing
down the process.
SMB—Server Message Block
A message format used by DOS and Windows to share files, directories and devices. NetBIOS is based on
the SMB format, and many network products use SMB. These SMB-based networks include Lan Manager,
Windows for Workgroups, Windows NT, and Lan Server. There are also a number of products that use
SMB to enable file sharing among different operating system platforms. Samba, for example, enables
UNIX and Windows machines to share directories and files.
SMTP—Simple Mail Transfer Protocol
A protocol for sending email messages between servers. Most email systems that send mail over the
Internet use SMTP to send messages from one server to another; the messages can then be retrieved
with an email client using either POP or IMAP. In addition, SMTP is generally used to send messages from
a mail client to a mail server. This is why you need to specify both the POP or IMAP server and the SMTP
server when you configure your email application.
SOAP—Simple Object Access Protocol
SOAP provides a simple, lightweight XML-based messaging protocol used to encode the information in
Web service request and response messages before sending them over a network. SOAP messages are
independent of any operating system or protocol and may be transported using a variety of Internet
protocols, including SMTP, MIME, and HTTP.
SPI—Service Provider Interface
The interface to modules within the backend server implementation that are not published to end
customers. Only the API is published. The SPI modularity that XC and FX engineers used to build
S
Glossary–24
DocuShare Installation Guide
additional module support on the backend (such as additional Conversion Services or a different Search/
Indexing Service)
Subscription Service
Built on JavaMail to interface the external SMTP gateway for email delivery.
T
DocuShare Installation Guide
Glossary–25
T
TCP/IP—Transmission Control Protocol/Internet Protocol
The suite of communications protocols used to connect hosts on the Internet. TCP/IP uses several
protocols, the two main ones being TCP and IP.
TextBridge
Optical character recognition (OCR) software used to convert paper documents into digital documents.
TIFF—Tagged Image File Format
One of the most widely supported file formats for storing bit-mapped images on personal computers (both
PCs and Macintosh computers). TIFF graphics can be any resolution, and they can be black and white,
gray-scaled, or color.
Files in TIFF format often end with a .tif extension.
Tomcat servlet
Tomcat is the official reference implementation of the Java Servlet 2.2 and JavaServer Pages 1.1
technologies. Developed under the Apache license in an open and participatory environment (Open
Source).
Tomcat can be used as either a standalone product with its own internal Web server or together with other
Web servers, including Apache, Netscape Enterprise Server, Microsoft Internet Information Server (IIS),
and Microsoft Personal Web Server. Tomcat requires a Java Runtime Enterprise Environment that
conforms to JRE 1.1 or later.
Tomcat is one of several open source collaborations that are collectively known as Jakarta.
U
Glossary–26
DocuShare Installation Guide
U
UNC—Uniform Naming Convention
A PC format for specifying the location of resources on a local area network (LAN). UNC uses the following
format: \\server-name\shared-resource-pathname
For example, to access the file
test.txt
in the directory
examples
on the shared server
silo
,
enter:
\\silo\examples\test.txt
UNC is also used to identify shared peripheral devices, such as printers. The idea behind UNC is to
provide a format so that each shared resource can be identified with a unique address.
URL—Uniform Resource Locator
An Internet address, the global address of documents and other resources on the World Wide Web. The
first part of the address indicates what protocol to use, and the second part specifies the IP address or the
domain name where the resource is located.
V
DocuShare Installation Guide
Glossary–27
V
VDF—View Definition Format
The Xerox DocuShare templating format based on XML used for DocuShare Release 5.0 and DocuShare
CPX Release 5 Web UI customization.
W
Glossary–28
DocuShare Installation Guide
W
Web
A short name for the World Wide Web.
WebDAV—World Wide Web Distributed Authoring and Versioning
The Internet Engineering Task Force (IETF) standard set of platform-independent extensions to HTTP that
allows users to collaboratively edit and manage files on remote Web servers. WebDAV features XML
properties on metadata; locking, which prevents authors from overwriting each other's changes;
namespace manipulation; and remote file management.
WebDAV servlet
Provides native WebDAV support. DocuShare 4.0 supports the current WebDAV specifications.
Weblog
See BLOG.
Web site
A site (location) on the World Wide Web. Each Web site contains a home page, which is the first document
users see when they enter the site. The site might also contain additional documents and files. Each site is
owned and managed by an individual, company or organization.
Wiki
A collaborative Web site comprises the perpetual collective work of many authors. Similar to a blog in
structure and logic, a wiki allows anyone to edit, delete or modify content that has been placed on the Web
site using a browser interface, including the work of previous authors. In contrast, a blog, typically authored
by an individual, does not allow visitors to change the original posted material, only add comments to the
original content.
Workflow
Basic workflow module to route documents through an approval or review cycle with other DocuShare
users. Uses Javascript that must be enabled in the DocuShare server and in the client browser. Also
known as Document Routing.
Workspace
A workspace provides a shared area for project and team collaboration. From a single page within
DocuShare you and other workspace members can gather and manage shared content, access
collaboration tools to facilitate your work, and communicate with each other.
World Wide Web
A system of Internet servers that support specially formatted documents. The documents are formatted in
HTML that supports links to other documents, as well as graphics, audio, and video files. This means you
W
DocuShare Installation Guide
Glossary–29
can jump from one document to another simply by clicking on hot spots. Not all Internet servers are part of
the World Wide Web.
X
Glossary–30
DocuShare Installation Guide
X
XML/HTTP servlet
DocuShare 4.0 supports the existing XML/HTTP interface. This is the main programmatic interface to
existing DocuShare servers and is the protocol on which the Windows Client SDK is built.
Y
DocuShare Installation Guide
Glossary–31
Y
Z
Glossary–32
DocuShare Installation Guide
Z